Handshake Raspberry Pi Access Point
Introduction
This guide will walk you through the process of configuring your Raspberry Pi as a wireless access point that resolves Handshake domains securely using RaspAP, hnsd, and Let's DANE.
By the end of this article, we'll have a WiFi access point (or router) that allows us to securely and easily connect to Handshake sites and services from any device[1].
We'll also explore configuring Tailscale (optional) to access these services anywhere in the world, without connecting to your Pi's access point!
[1]: Any device that lets you install certificates and configure HTTP(s) proxies.
Table of Contents
- Preparing the Pi
- Installing RaspAP
- Installing hnsd
- Configuring hnsd
- Installing Let's DANE
- Configuring Let's DANE
- Configuring RaspAP
- Configuring Devices (iPhone)
- Tailscale Setup (Optional)
Prerequisites
- Raspberry Pi (or any computer)
- I used a Raspberry Pi 4 Model B with 8GB of RAM, but there's no reason this shouldn't work with other models
- Preferably a model with an Ethernet port, otherwise you could use a USB-to-Ethernet adapter
- MicroSD card (and adapter if needed)
- Linux, macOS, or Windows computer
- Needed for flashing the MicroSD Card as well as SSHing into your Pi
Preparing the Pi
Download and run the latest version of Raspberry Pi Imager for your operating system: https://www.raspberrypi.com/software/
Click the cogwheel icon in the bottom right to change the default settings. You'll want to set the following settings:
- Hostname: You can set this to whatever you'd like. I used "pi4".
- Enable SSH: Public-key authentication is probably more secure, but you can use password authentication if you prefer.
- Username and Password: Set these however you'd like. I set my username as "spencer".
- Configure Wireless LAN: I recommend leaving this option unticked. RaspAP does have an experimental AP-STA mode, but I've found that using an Ethernet connection is more reliable.
- Set Locale Settings: Set these to your preference.
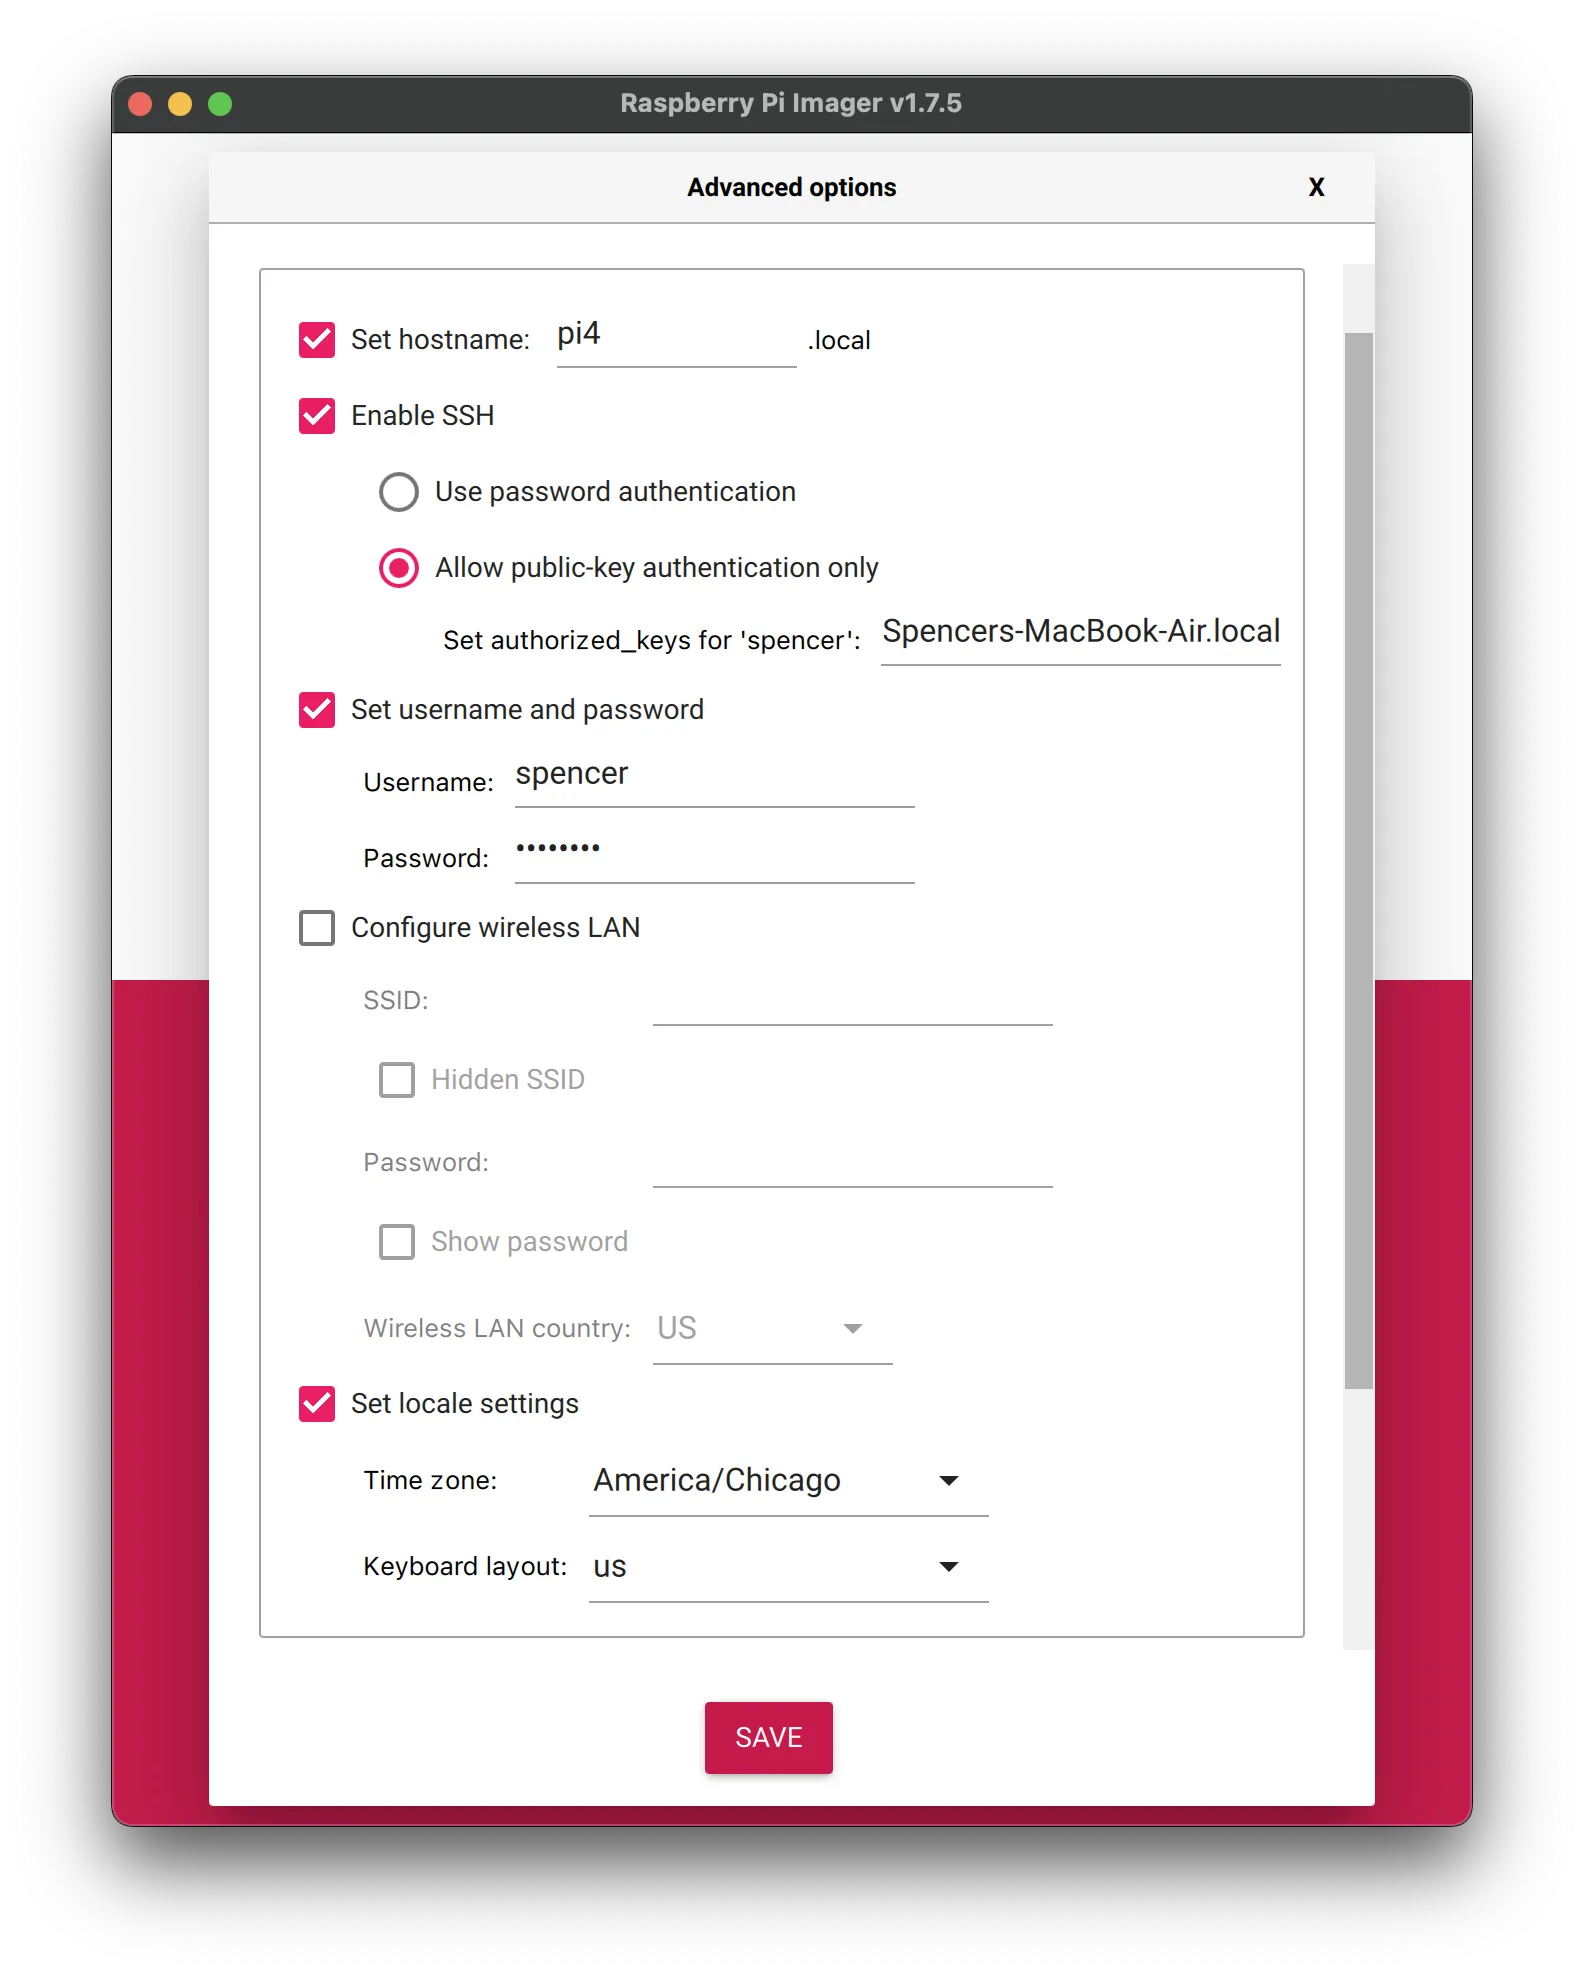
Hit save to confirm your settings. For the operating system, select "Raspberry Pi OS (other)" and then either "Raspberry Pi OS Lite (32-bit)" or "Raspberry Pi OS Lite (64-bit)" depending on your Pi model. Raspberry Pi 3s and 4s can use the 64-bit version, but all other models should use the 32-bit version.
If you haven't already, insert your MicroSD card into your computer and select it in Raspberry Pi Imager. Make sure you select the correct drive, as this process will erase all data on the drive. Once you've selected the drive, click "Write".
This process will take a few minutes. Once it's finished, you can eject your SD card and insert it into your Pi. You'll also want to connect your ethernet and power cable at this point.
You'll want to wait a few minutes for the Pi to boot up and connect to your network. You'll then want to SSH into your Pi. This process can vary depending on your operating system, but on macOS & Linux you should be able to run ssh <username>@<hostname>.local in your terminal.
Installing RaspAP
We'll be following the instructions from the RaspAP website for this step.
First, we'll update our Pi's packages:
sudo apt update
sudo apt autoremove
sudo apt full-upgrade
Then we'll do a quick reboot:
sudo rebootThe reboot might take a few minutes, but once it's done, SSH back into your Pi.
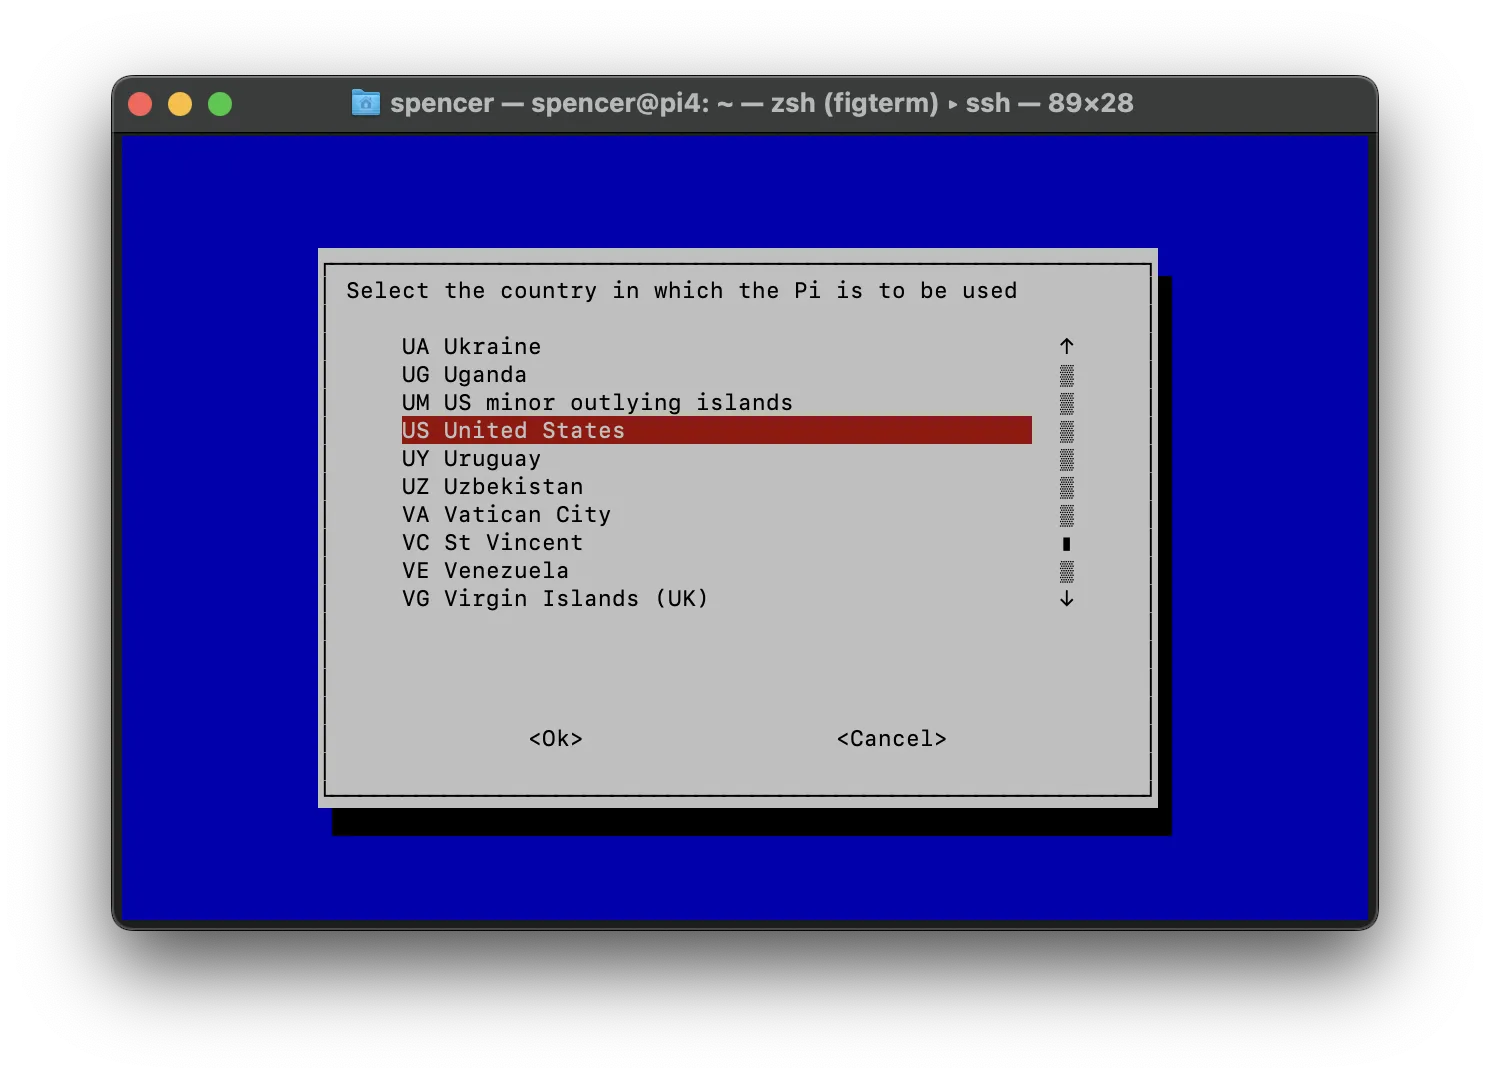
You'll need to set the proper WiFi Country for your Pi.
sudo raspi-configYou can navigate this menu with the arrow keys, enter key, and escape key. You'll want to go to "Localisation Options" > "WLAN Country" and select your country.
Finally, we'll install RaspAP:
curl -sL https://install.raspap.com | bashThis script will take a while to run. It'll also ask you a couple of questions. I'd recommend choosing "Y" for all the recommended options, and no for everything else (ad blocking, OpenVPN, and WireGuard). But you can experiment with these settings if you'd like.
Once this script finishes, you'll be prompted to reboot your Pi. Go ahead and do that. Once it's booted back up, SSH back in!
Before we move on, we need to fix an issue that occurs upon rebooting our Pi. While I was configuring my Pi, I noticed that the IP address for wlan0 (the access point's interface) was not being set. You can fix this by restarting the hotspot in the RaspAP web UI, but that's not very convenient, so let's automate it!
sudo nano /etc/systemd/system/raspap-hotspot.serviceNano is an easy-to-use terminal text editor. Once it opens, you'll want to paste the following contents into the file:
[Unit]
Description=Start RaspAP Hotspot
After=network.target

[Service]
Type=simple
ExecStart=/bin/bash -c "sleep 15 && /etc/raspap/hostapd/servicestart.sh"
TimeoutStartSec=0

[Install]
WantedBy=multi-user.target
Exit with Ctrl + x , y, and enter. Now enable it like so:
sudo systemctl enable raspap-hotspotGreat! We're ready to move on.
Installing hnsd
The next step is to install hnsd. We'll be building this from source, following the instructions from the GitHub repo.
First, we'll install the required dependencies:
sudo apt install autotools-dev libtool libunbound-devThen, we'll clone and CD into the repository:
git clone https://github.com/handshake-org/hnsd.git
cd hnsd
Finally, we'll build and install hnsd:
./autogen.sh && ./configure && make
sudo make install
Configuring hnsd
Now that we've got hnsd installed, we'll need to make a few changes to our system to configure it.
By default, RaspAP runs dnsmasq. RaspAP uses dnsmasq for it's DHCP server, but still uses port 53 (which we will need for hnsd). If you'd like, you can check this by running sudo apt install lsof && sudo lsof -i :53.
RaspAP allows us to place our own dnsmasq configuration files in /etc/dnsmasq.d. (https://docs.raspap.com/faq/?h=dnsmasq#can-i-use-raspap-with-my-custom-dnsmasq-configuration). This allows us to disable dnsmasq's DNS server and use hnsd instead.
You can run the following command to make this configuration change:
echo "port=0" | sudo tee /etc/dnsmasq.d/disable_dns.confand then restart dnsmasq:
sudo systemctl restart dnsmasqNow, if you were to run sudo lsof -i :53, you should see that dnsmasq is no longer using port 53. Great!
Lastly, we can configure hnsd to run as a systemd service. This enables hnsd to start automatically on boot.
Create a new file inside /etc/systemd/systemd/system/:
sudo nano /etc/systemd/system/hnsd.serviceand paste this:
[Unit]
Description=HNSD Service
After=raspap-hotspot.service

[Service]
Type=simple
User=spencer
ExecStart=/usr/local/bin/hnsd -p 4 -r 10.3.141.1:53
Restart=on-failure
RestartSec=5

[Install]
WantedBy=multi-user.target
You'll want to be sure to replace spencer with your own username. Notice the IP, 10.3.141.1. This is the default IP for RaspAP's hotspot interface (wlan0). You shouldn't need to change this, but you can check the IP with ip -4 addr show wlan0 | grep -oP '(?<=inet\s)\d+(\.\d+){3}'.
Once you've pasted this into the file and changed the username, you can save and exit by pressing ctrl + x, y, and then enter.
Before we can enable the service, we will need to give the hnsd binary permission to bind to low ports (such as 53).
sudo setcap 'cap_net_bind_service=+ep' /usr/local/bin/hnsdNow we can enable and start the service:
sudo systemctl enable --now hnsdAwesome! Now we've got hnsd up and running, bound to our hotspot interface on port 53! You can check the status of this process with systemctl status hnsd.
Now, we must configure our system to use hnsd as our DNS server. The easiest way to do this is to edit the /etc/resolv.conf file, then make it immutable. This will prevent other processes (resolvconf, dhcpcd, NetworkManager, etc.) from modifying the file. Is this good practice? No. Does it work? Yeah (I think so...)
echo "nameserver 10.3.141.1" | sudo tee /etc/resolv.conf
sudo chattr +i /etc/resolv.conf
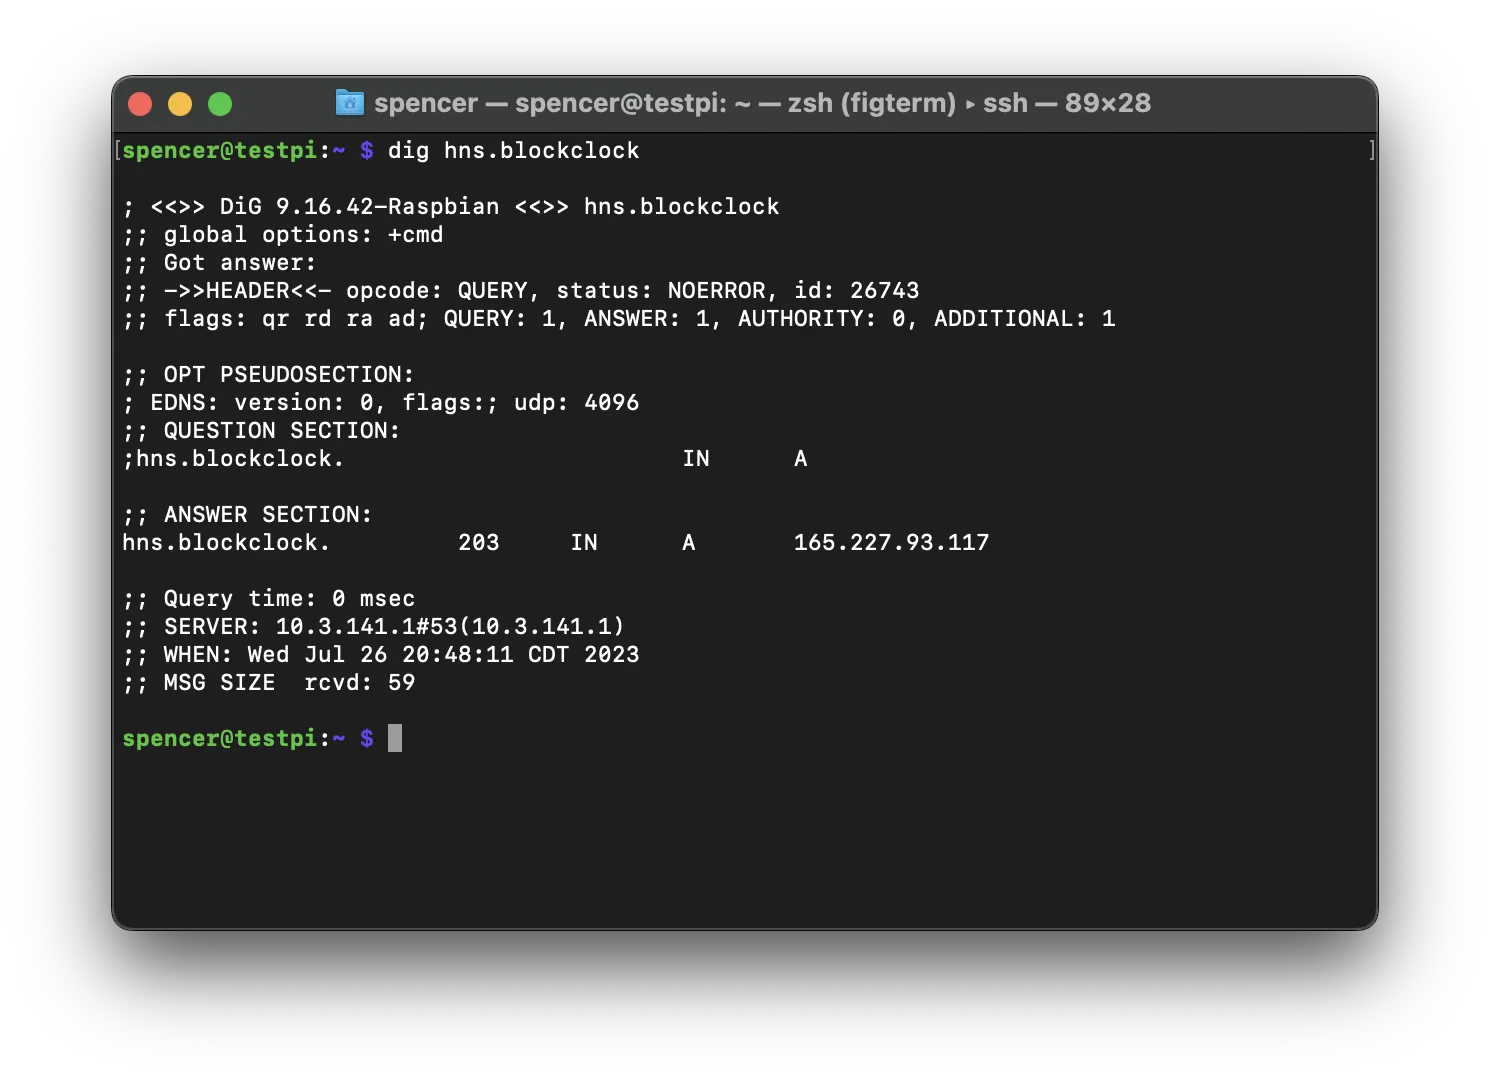
sudo systemctl restart networkingYou can test the resolution by running sudo apt install dnsutils && dig hns.blockclock. Please note that it might take several minutes for hnsd to sync.
You should see a response similar to this:
Installing Let's DANE
To install Let's DANE, we'll first need to install Go. We'll be following the instructions from the Go website.
First, we'll download the latest version of Go. Copy the tarball link for your architecture (linux-arm64 for 64-bit Pi, linux-armv6l for 32-bit Pi) from https://go.dev/dl/.
cd ~
wget -O go.tar.gz <tarball_link>
Then we'll extract the tarball, move it to /usr/local, and add it to our PATH:
sudo tar -C /usr/local -xzf go.tar.gz
echo 'export PATH=$PATH:/usr/local/go/bin:$HOME/go/bin' >> ~/.profile
source ~/.profile
rm go.tar.gz
You can check Go is installed with go version. If you see an error such as No such file or directory, it's likely that you've installed the incorrect version of Go for your OS architecture. You can check your OS architecture with dpkg --print-architecture. If it says armhf, you'll want to install the linux-armv6l version of Go.
Now we can install Let's DANE:
git clone https://github.com/buffrr/letsdane
cd letsdane/cmd/letsdane
go build -tags unbound
go install
Configuring Let's DANE
Similar to the hnsd configuration, we'll need to create a systemd service for Let's DANE. Create a new file inside /etc/systemd/systemd/system/:
sudo nano /etc/systemd/system/letsdane.servicePaste the following contents into the file:
[Unit]
Description=Let's DANE Service
After=raspap-hotspot.service

[Service]
Type=simple
User=spencer
ExecStart=/home/spencer/go/bin/letsdane -r 10.3.141.1:53 -addr 10.3.141.1:8080 -skip-dnssec -skip-icann
Restart=on-failure
RestartSec=5

[Install]
WantedBy=multi-user.target
Again, you'll want to replace spencer with your own username in both the User and ExecStart fields. Also ensure that the IP addresses match the one you've set for hnsd (ip -4 addr show wlan0 | grep -oP '(?<=inet\s)\d+(\.\d+){3}')
Here's a breakdown of that ExecStart command:
-r 10.3.141.1:53: This tells letsdane that our resolver is listening on this IP and port-addr 10.3.141.1:8080: This tells the letsdane proxy to listen on the same IP, port 8080. You can probably change this port if you want, but 8080 is a commonly used port for proxies.-skip-dnssec: This tells letsdane to skip DNSSEC validation. We can skip this because hnsd already takes care of this!-skip-icann: This tells letsdane to skip looking up TLSA records and issuing certificates for ICANN domains. Omitting this flag has been known to cause issues with some websites.
Once again, save this file with ctrl + x, y, and then enter.
Now we can enable and start the service:
sudo systemctl enable --now letsdaneYou can check the status of this process with systemctl status letsdane.
Configuring RaspAP
Now that hnsd and Let's DANE are installed and running, we need to make some changes to the default RaspAP configuration.
In a web browser, navigate to http://<hostname>.local. You should be prompted to login with a username and password. The RaspAP defaults are admin and secret. You should change these after setup; this can be done at the "Authentication" page in the sidebar.
In order to have our devices utilize the hnsd server we've configured, we need to list it in RaspAP's DHCP settings. Navigate to the "DHCP Server" page in the sidebar, and scroll down until you see fields for DNS Server 1 & 2.
You'll want to set DNS Server 1 to 10.3.141.1 (or ip -4 addr show wlan0 | grep -oP '(?<=inet\s)\d+(\.\d+){3}'). I've left DNS Server 2 blank in my configuration.
It should look something like this:
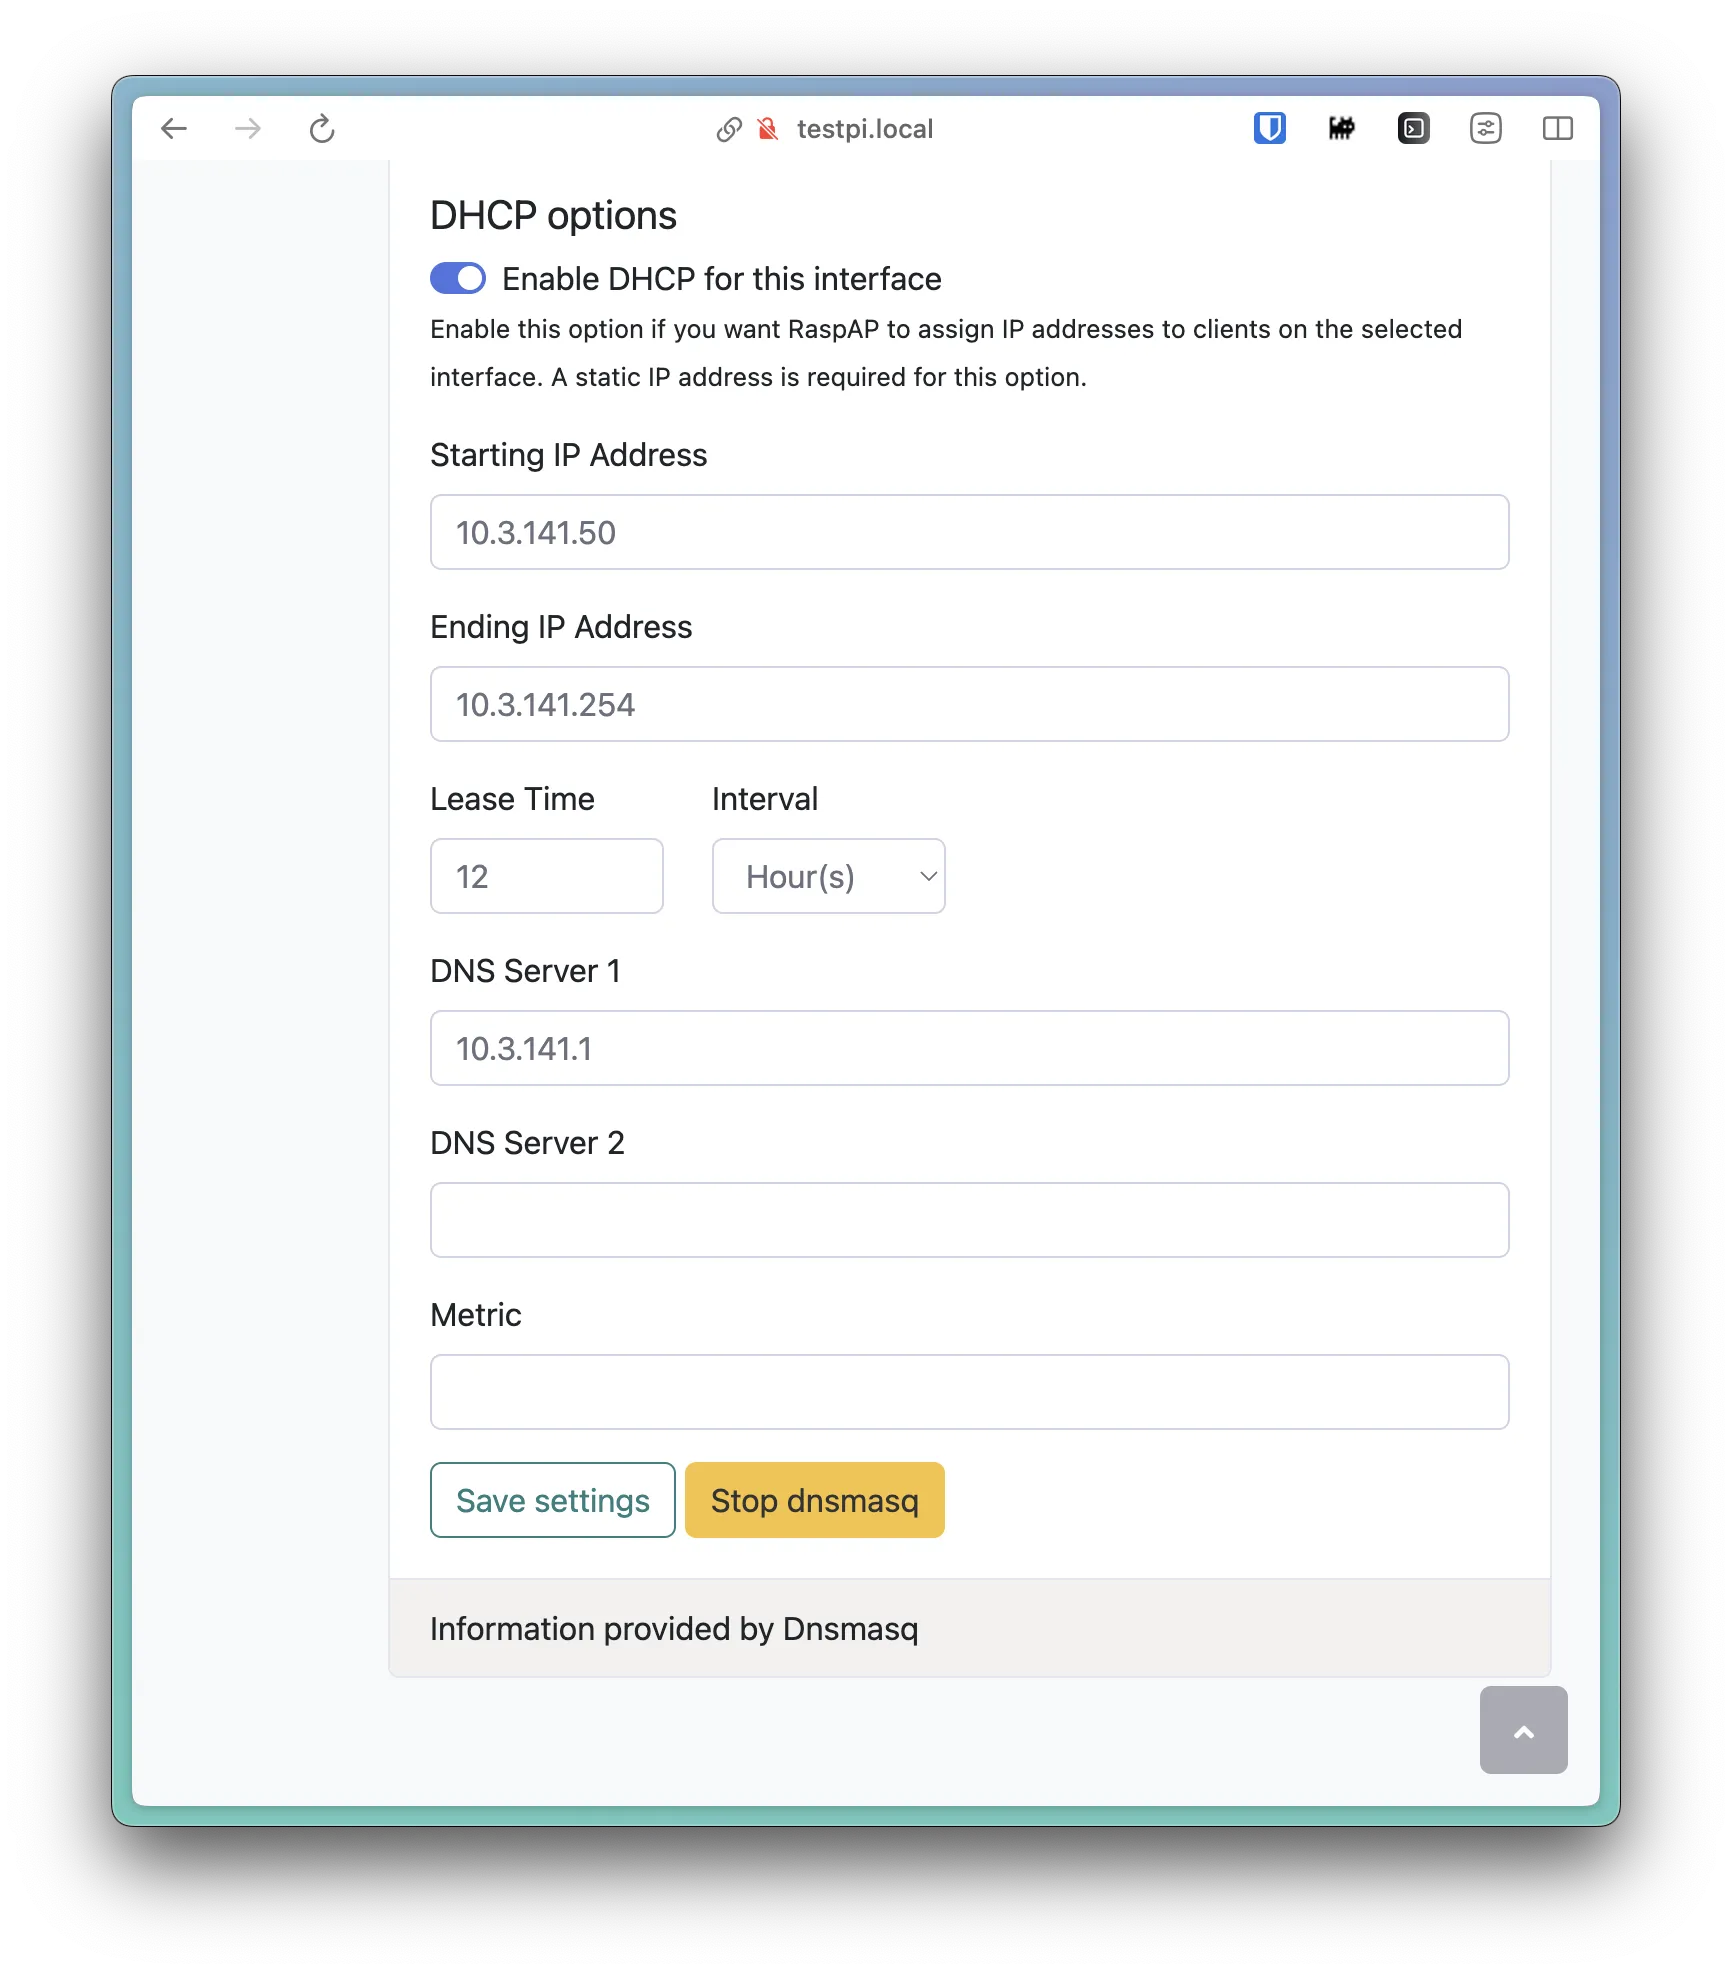
Make sure to click the "Save settings button". At this point, it would be a good idea to restart dnsmasq by hitting the "Stop dnsmasq" button, waiting for the page reload, and then hitting the "Start dnsmasq" button.
Go ahead and navigate to the "Hotspot" page in the sidebar.
In the "Basic" tab:
- SSID: This is the name of your access point that you will connect to over WiFi. You can set it to whatever you'd like.
- Wireless Mode: I would set this to 802.11ac - 5GHz or 802.11n - 2.4GHz, though any of them should work fine. If one of them is grayed out, check back later.
In the "Security" tab:
- PSK: Obviously, change this. I'd recommend just hitting the magic wand button on the right. This will be the password used to connect to the network. You can either copy and paste that or use the generated QR code to connect mobile devices.
In the "Advanced" tab:
- Country Code: Change this to your country.
After you've made these changes, click "Save settings". If you had to change your Country Code, you can check to see if any of the Wireless Mode options that were previously grayed out are now available.
After you're done making changes, click "Restart hotspot".
Don't forget to change your RaspAP admin password at the "Authentication" page in the sidebar!
Configuring Devices
Awesome! We're almost finished! All we need to do now is instruct our devices to use the HTTP proxy we configured.
The general process is the same for all operating systems, but I'll be doing it for my iPhone.
First, we will need to install the CA certificate Let's DANE generously generated for us.
From your macOS/Linux[1] computer (not SSH'd into the Pi), we can run the following command:
scp <hostname>.local:~/.letsdane/cert.crt ~/Downloads/letsdane.crtReplace <hostname> with the hostname of your Pi.
This will remotely grab the Let's DANE generated certificate and spit it out into your downloads folder.
I opted to just AirDrop this file to my iPhone, but you can send it to whatever device however you want!
If you get a pop-up like this:
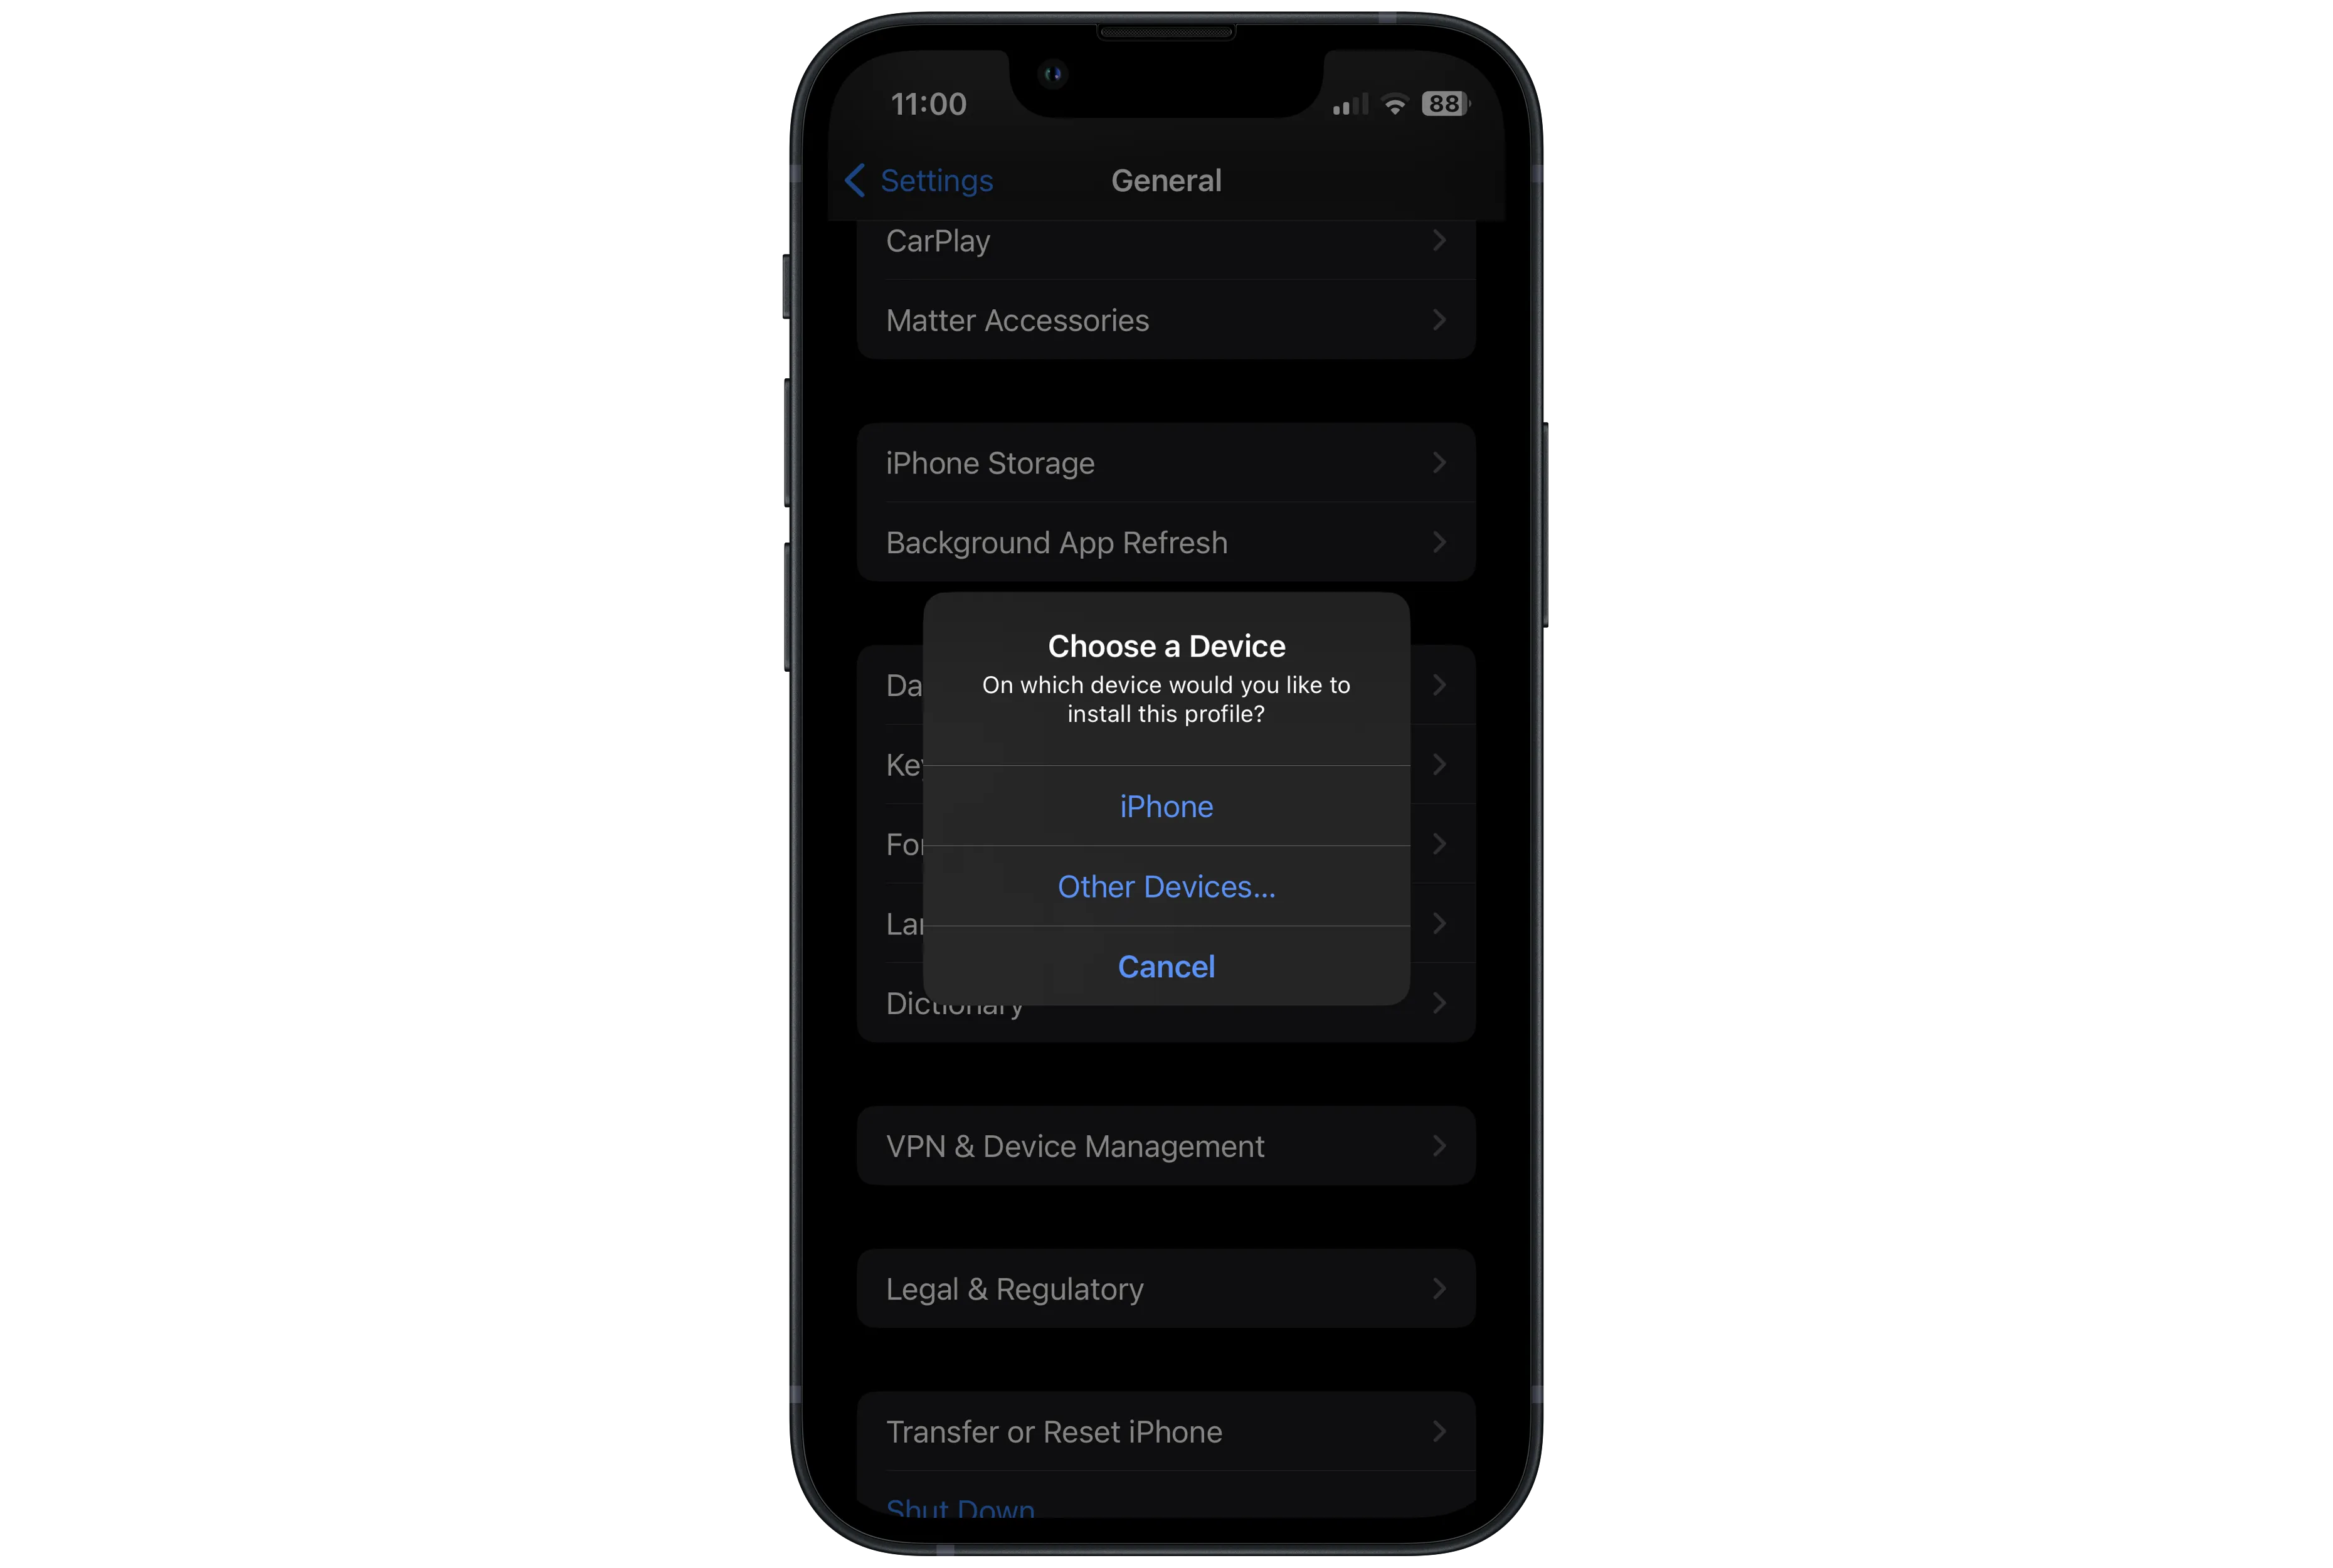
Just choose "iPhone", and then "Close".
On your iPhone, navigate to Settings > General > VPN & Device Management, and tap the DNSSEC downloaded profile.
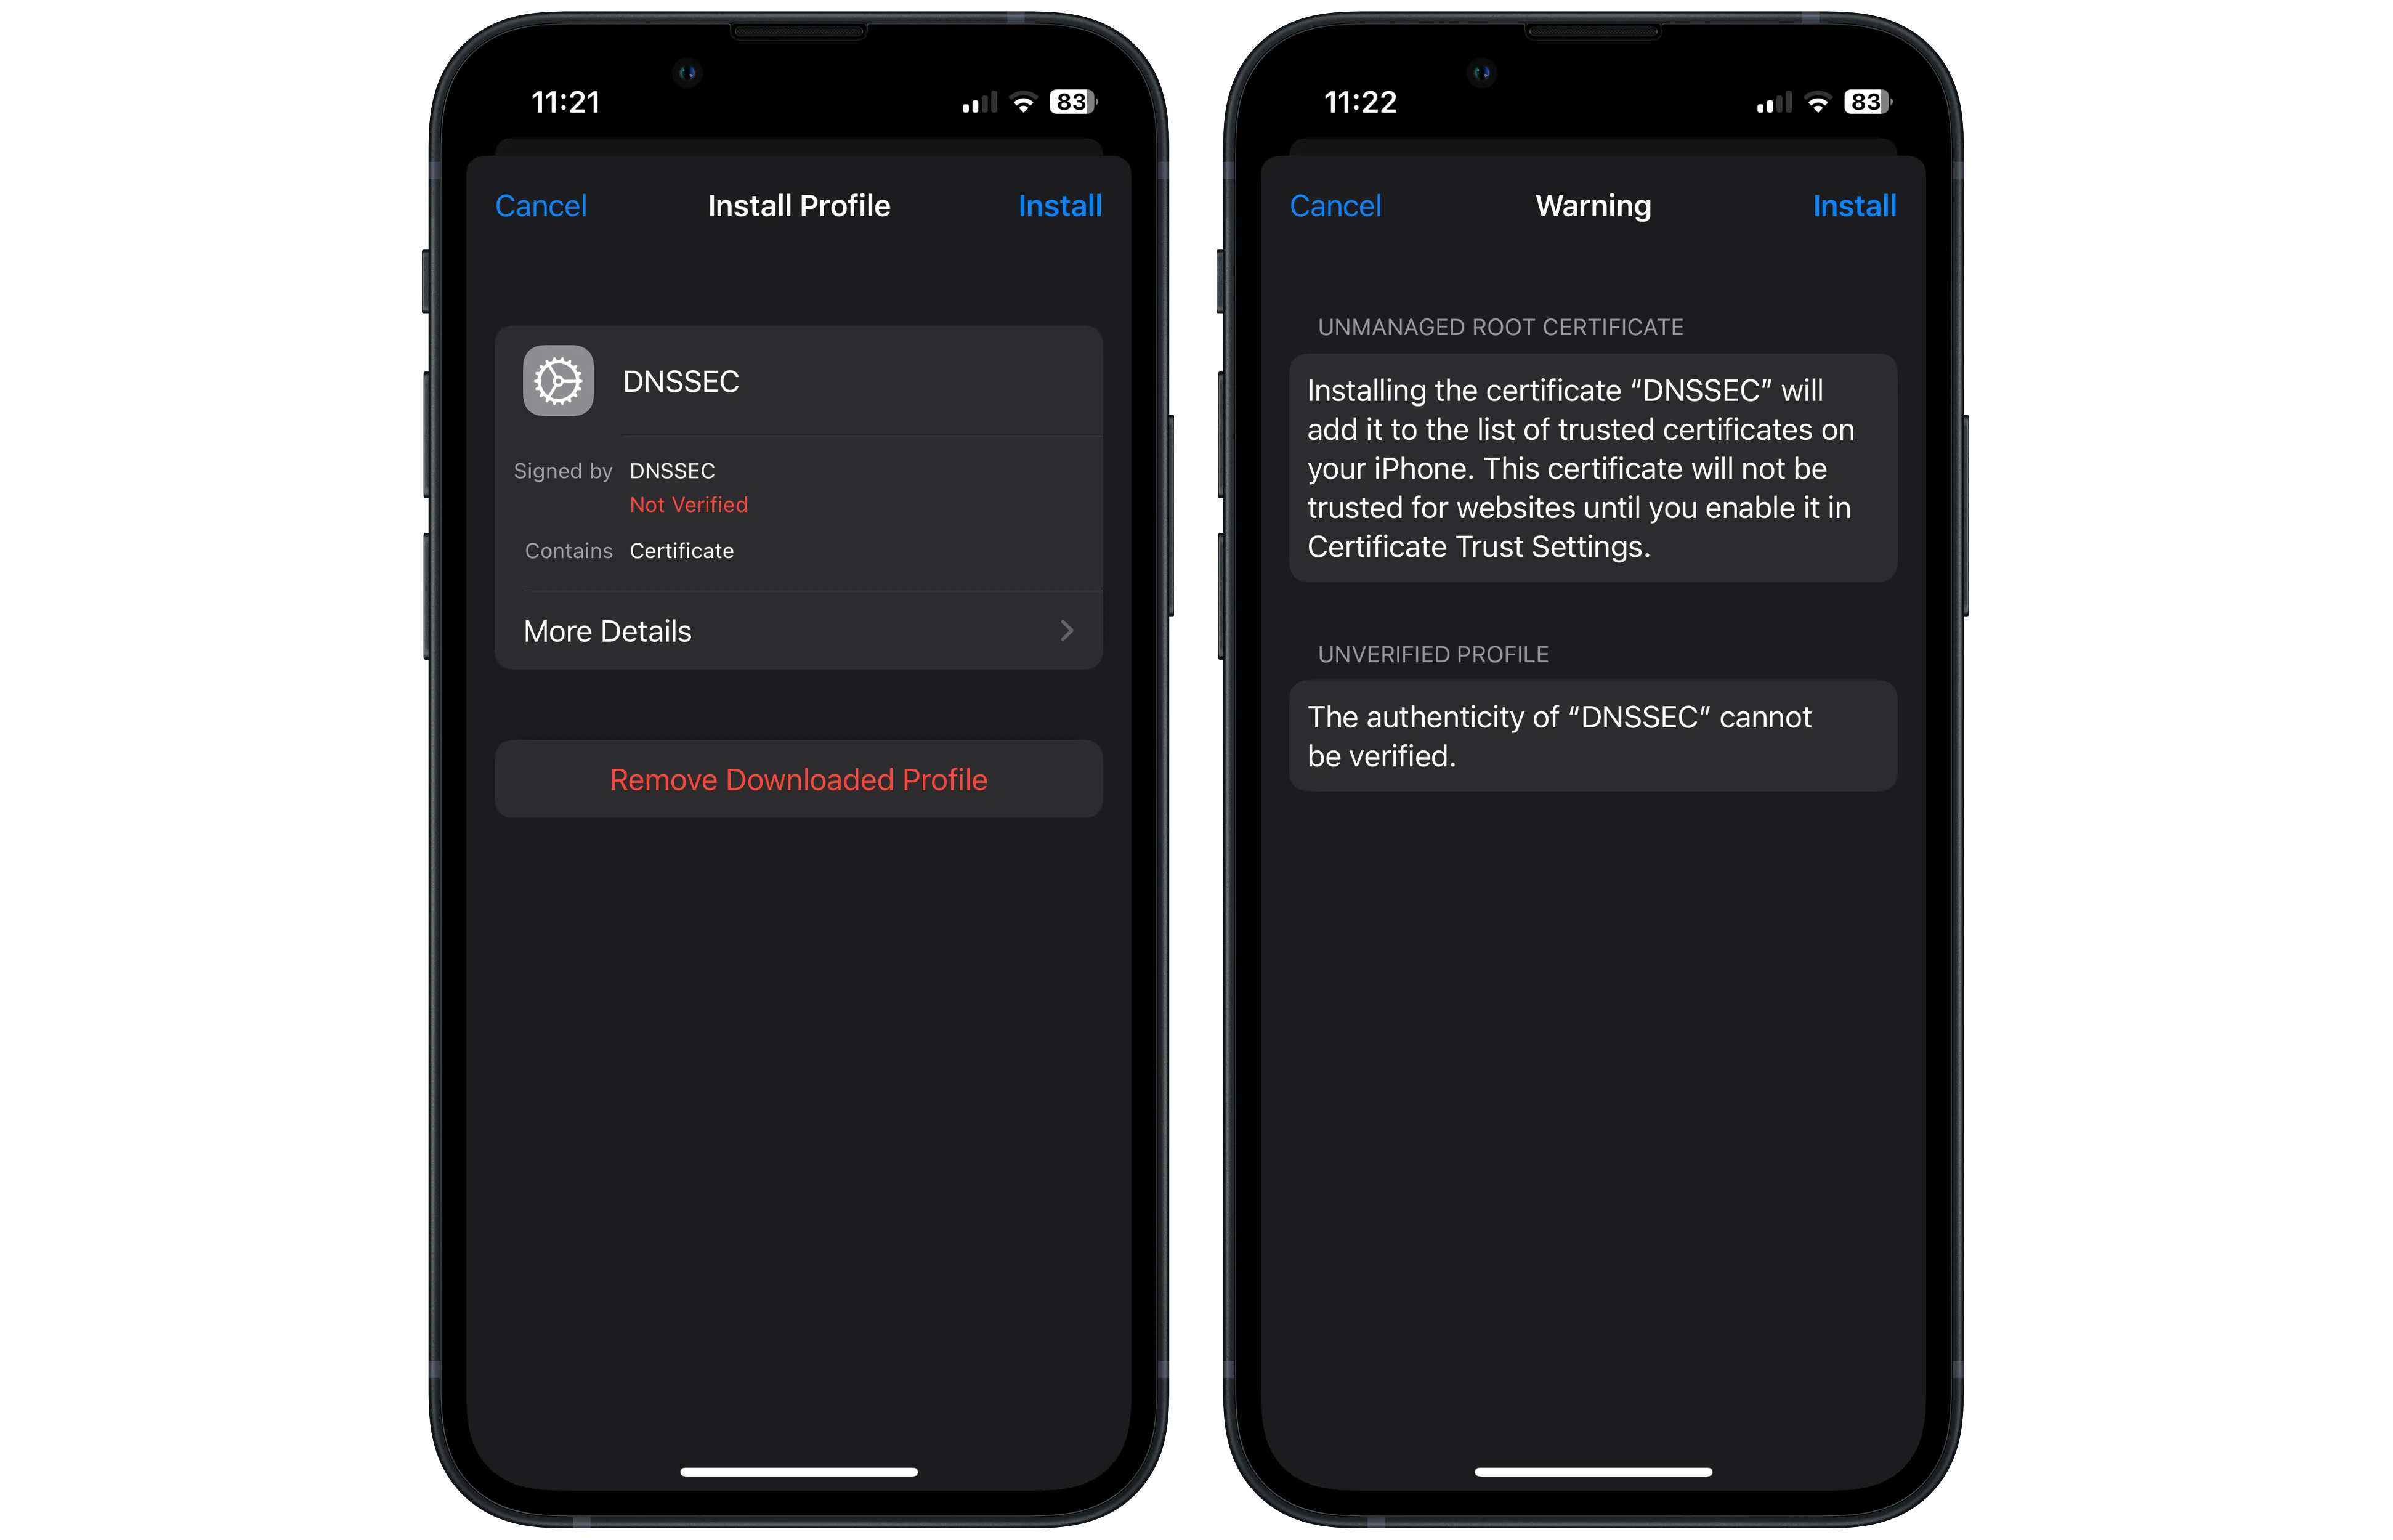
Tap "Install" in the top right on both of these screens.
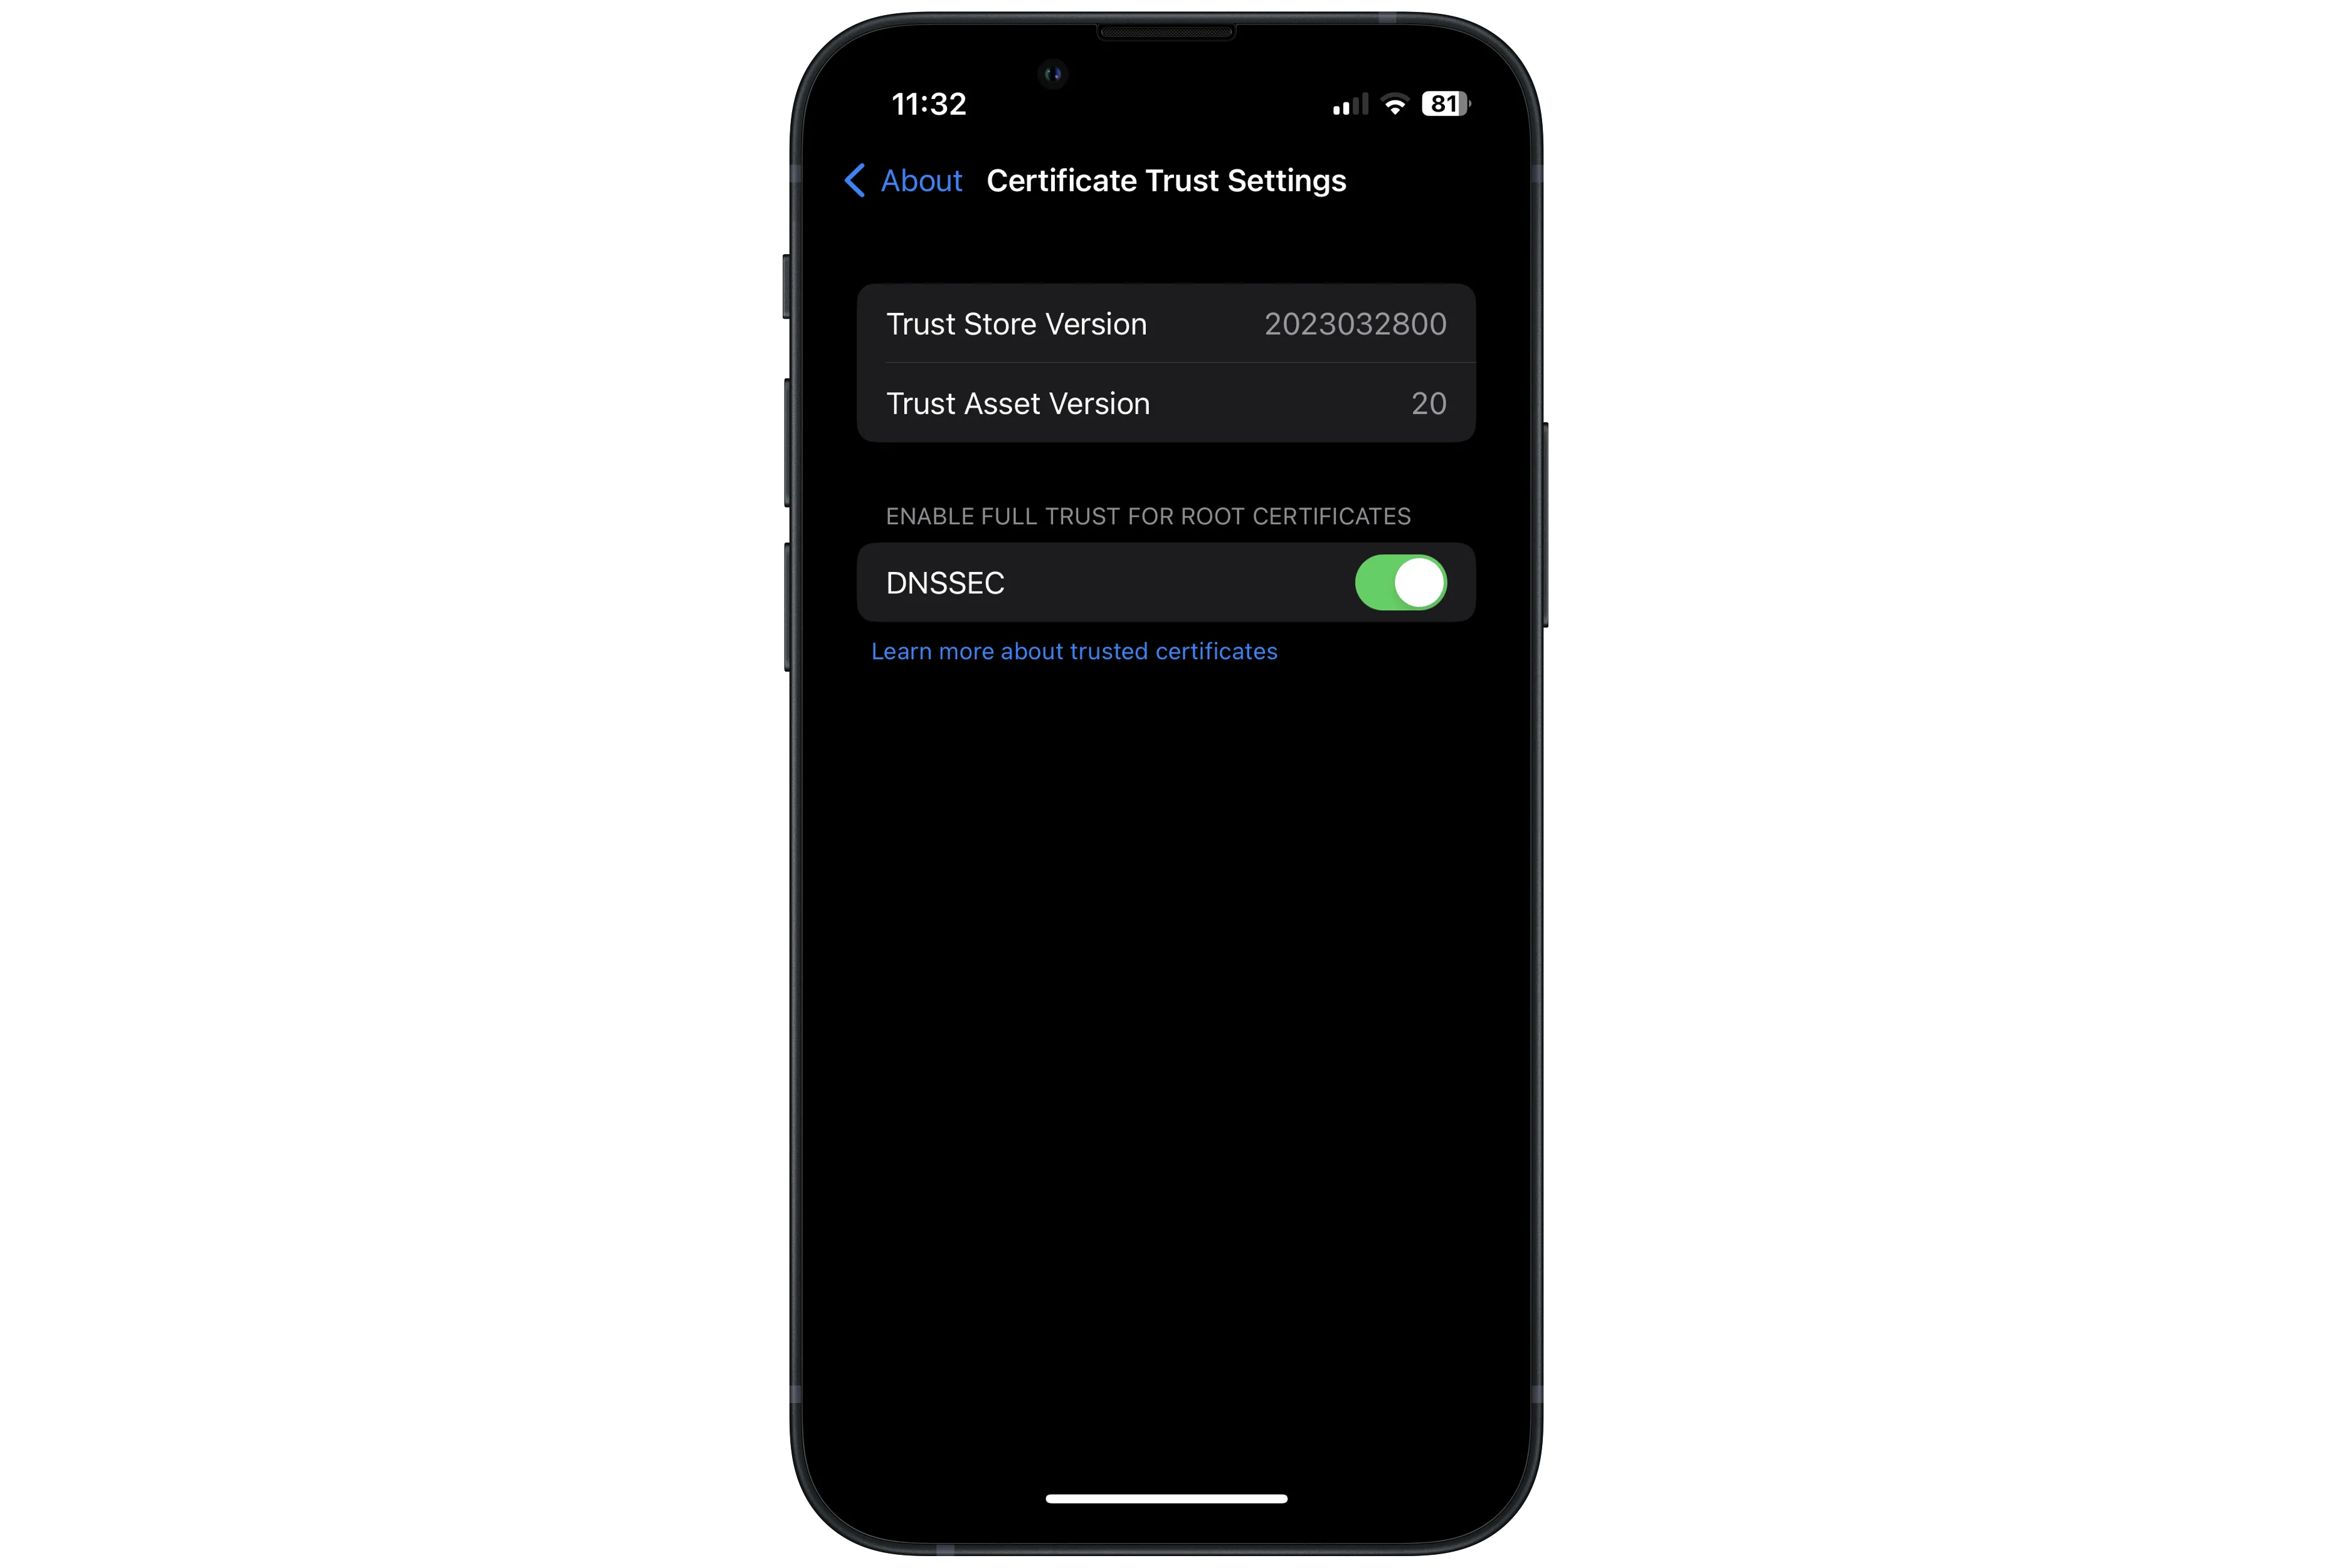
After this, navigate to Settings > General > About > Certificate Trust Settings (you'll have to scroll all the way down).
Then flip the switch next to DNSSEC and choose "Continue".
We're nearly there!
Navigate to Settings > Wi-Fi and connect to your Pi's SSID if you haven't yet.
Once you've connected, tap the ⓘ icon next to the network name.
From here, scroll down and choose "Configure Proxy". You'll want to set this to manual.
Server should be set to 10.3.141.1, and port should be set to 8080. You can leave authentication disabled.
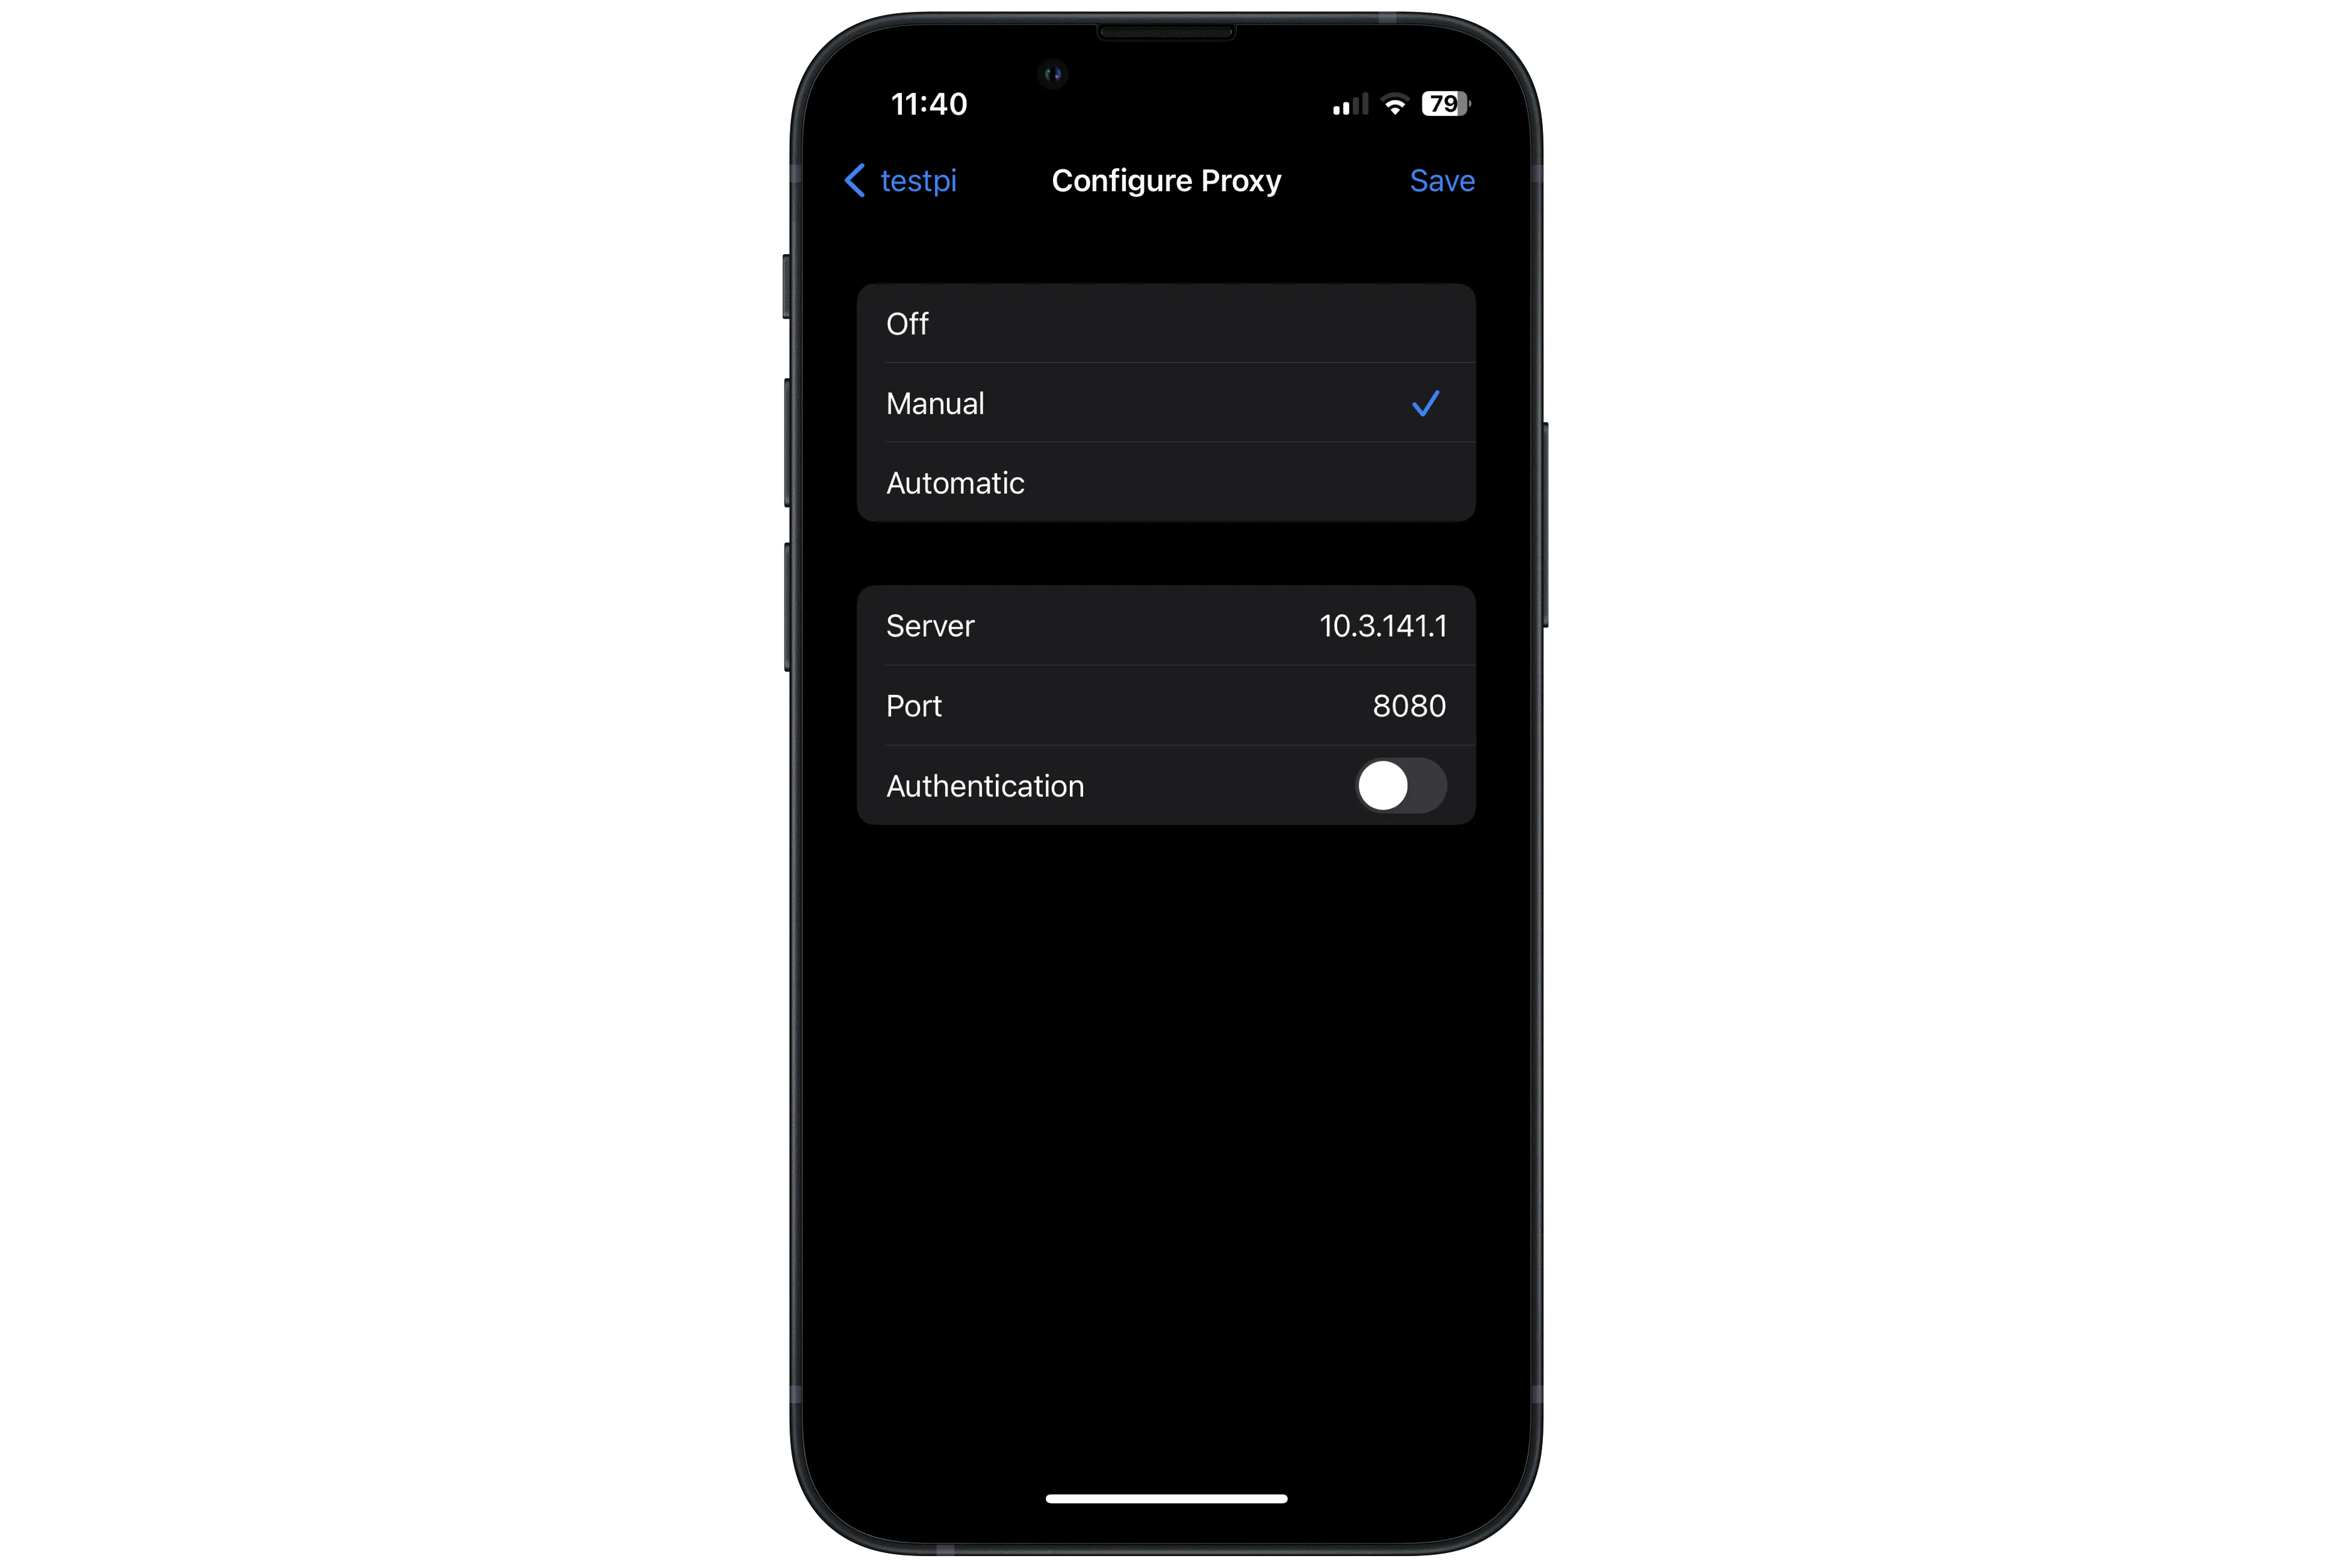
Hit save in the top right, and you should be good to go!
You can test it out by visiting a DANE-secured Handshake website such as the following:
- https://hns.blockclock
- https://x
- https://letsdane
- https://hnschat
- https://shakeplace
- https://spencersolberg
Note that some devices don't handle HTTP proxies on a per-network basis. If you switch to a different WiFi network and can't connect to the internet, it's likely because you're device is still trying to connect to the HTTP proxy.
[1]: You may have to install an SFTP client if you're using Windows.
Tailscale Setup
You're now accessing Handshake sites and services securely! But what if you connect to a different WiFi network? Currently, the services we've set up on our Pi are only accessible to devices on its own network. This may not be ideal.
Thankfully, we have excellent solutions such as Tailscale that allow us to connect to our Pi from anywhere in the world, free of charge. This solution allows us to access our hnsd and Let's DANE services without exposing them to the public internet, and it's fairly simple to set up.
First, sign up for a free Tailscale account if you don't already have one.
Then we'll run the installation script on our Raspberry Pi:
curl -fsSL https://tailscale.com/install.sh | shthen log in with
sudo tailscale upNext we will enable subnet routing. This is a feature in Tailscale that will enable us to access services and devices on our Pi access point's subnet (10.3.141.0/24).
Following the instructions on Tailscale's site, we must first enable IP forwarding.
echo 'net.ipv4.ip_forward = 1' | sudo tee -a /etc/sysctl.d/99-tailscale.conf
echo 'net.ipv6.conf.all.forwarding = 1' | sudo tee -a /etc/sysctl.d/99-tailscale.conf
sudo sysctl -p /etc/sysctl.d/99-tailscale.conf
Then we'll "advertise" our subnet route:
sudo tailscale up --advertise-routes=10.3.141.0/24Finally, open the machines page in the Tailscale admin console and approve the route. A more detailed guide can be found here: https://tailscale.com/kb/1019/subnets/#step-3-enable-subnet-routes-from-the-admin-console
Now, you can install the Tailscale client on the rest of your devices[1] in order to access the Pi's services.
And you're off to the races! You can now use the same 10.3.141.1 IP to connect to hnsd and Let's DANE through Tailscale.
[1]: On Linux Tailscale clients, you must run sudo tailscale up --accept-routes to discover subnet routes.