Raspberry Pi Digital Photo Frame
Introduction
In this post, we'll create a Raspberry Pi-powered digital photo frame that shuffles through photos of your selection. Photos are uploaded directly to the Raspberry Pi, and everything is handled locally on the device.
We'll achieve this by using FIM and a Remix app I developed to upload and process photos, PhotoCrust.

Table of Contents
- Preparing the Pi
- Installing Dependencies
- Installing PhotoCrust
- Configuring FIM
- Putting it all Together
Prerequisites
- Raspberry Pi (or similar)
- A model with built-in Wi-Fi is ideal to avoid running multiple cables to the photo frame
- I used a Raspberry Pi Zero W
- MicroSD card (and necessary adapter)
- The software doesn't require much space; I used a 16GB card, which works perfectly
- HDMI screen
- I used a 7" 1024x600 display from Amazon (powered completely from the Pi Zero)
- Cables/adapters
- You'll probably need a Mini HDMI to HDMI and a Micro USB cable to power the screen
- Linux, macOS, or Windows Computer
- Needed for flashing the MicroSD Card as well as SSHing into your Pi
- Photo frame
Preparing the Pi
Install the latest version of Raspberry Pi Imager. Choose your Pi's model on the left, and then choose the operating system in the middle. For my Pi Zero, I went with "Raspberry Pi OS Lite (32-bit)" [1], which is under the "Raspberry Pi OS (other)" category.
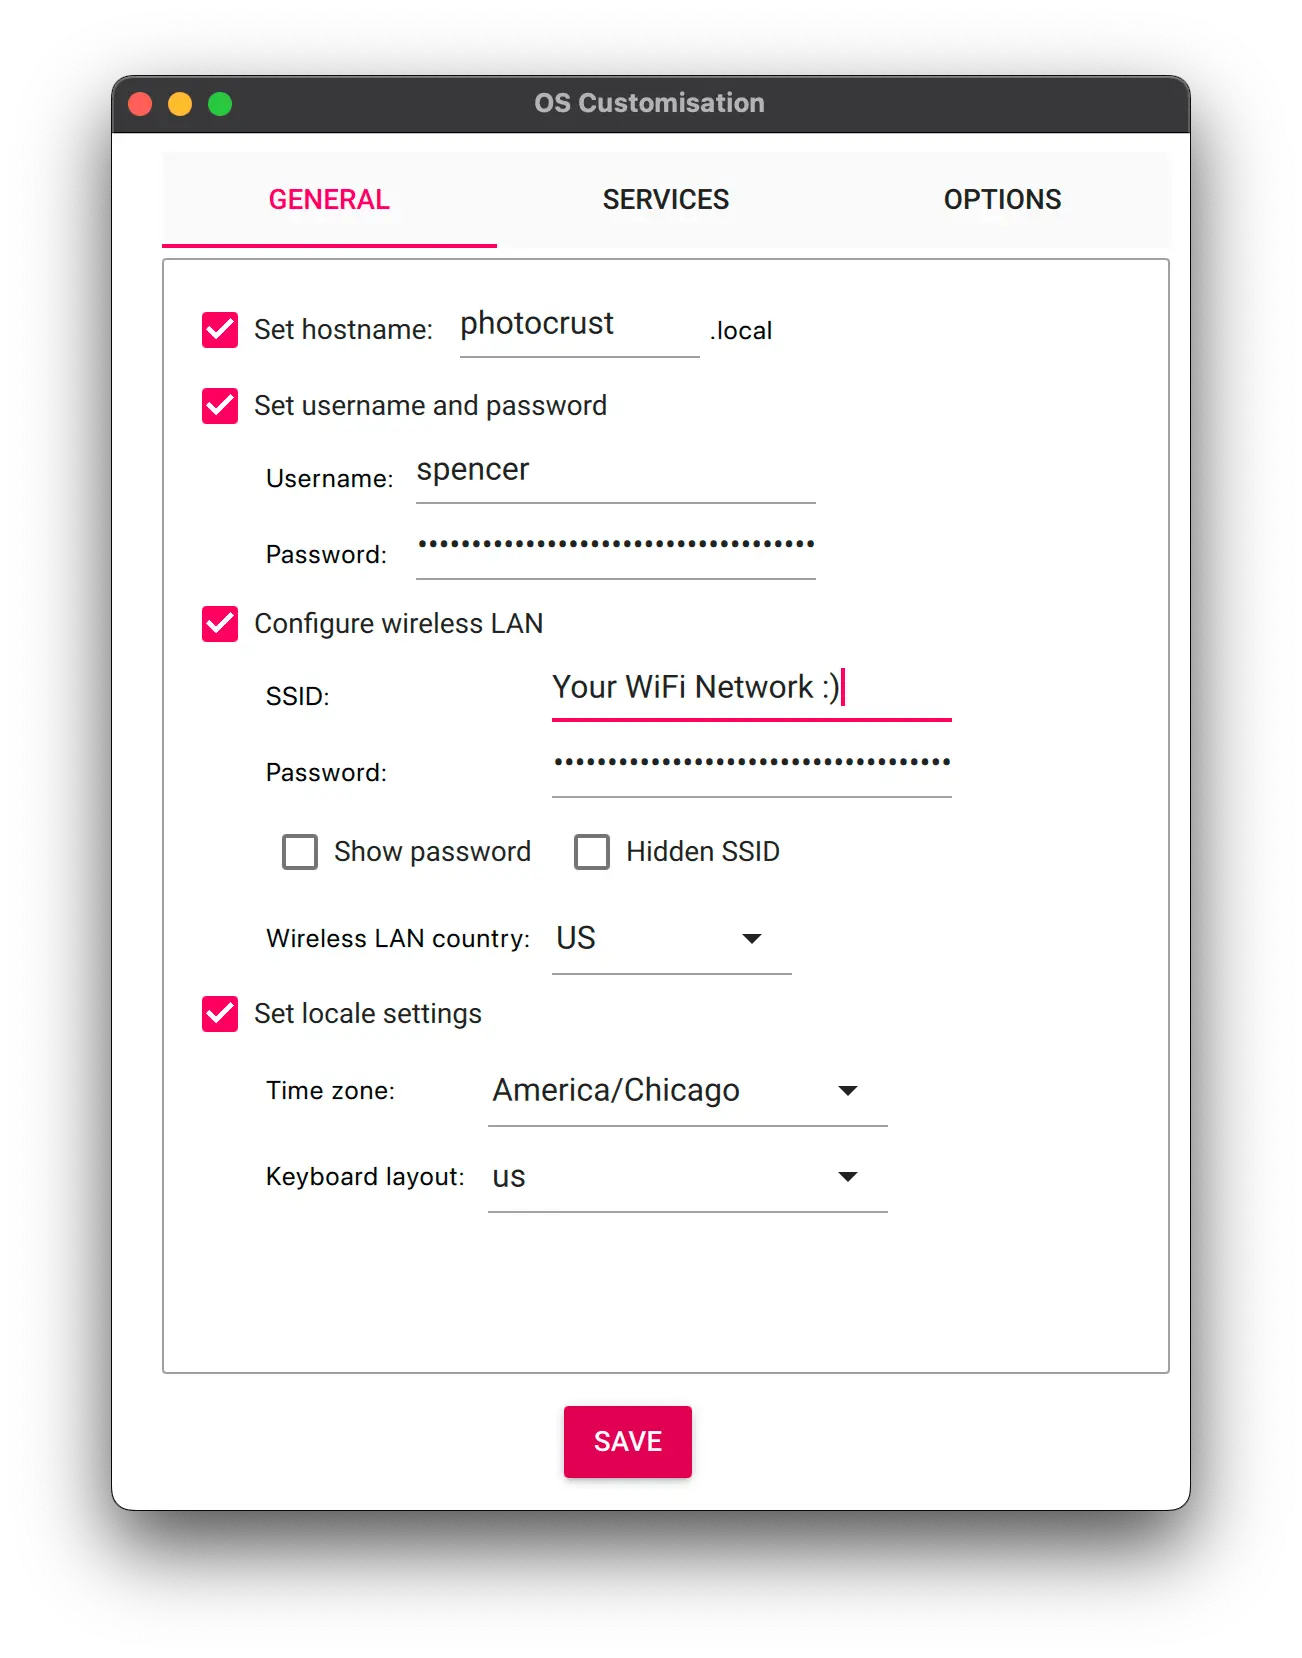
Click the "Choose Storage" button and select the correct MicroSD card. As always, be careful when selecting this as it will erase all of the data on the drive. Click "Next", and when the pop-up appears, click "Edit Settings" and fill out as follows:
- Hostname: Set this to something you'll remember, as you'll use it to SSH into the Pi as well as accessing the web UI. I called mine "photocrust".
- Username and Password: I recommend setting these to whatever you'd like.
- Configure Wireless LAN: If you're not using ethernet, you'll probably want to configure this. Note that some Pi models, such as my Pi Zero W only support 2.4GHz networks.
- Locale Settings: Choose the appropriate options for your time zone/layout.
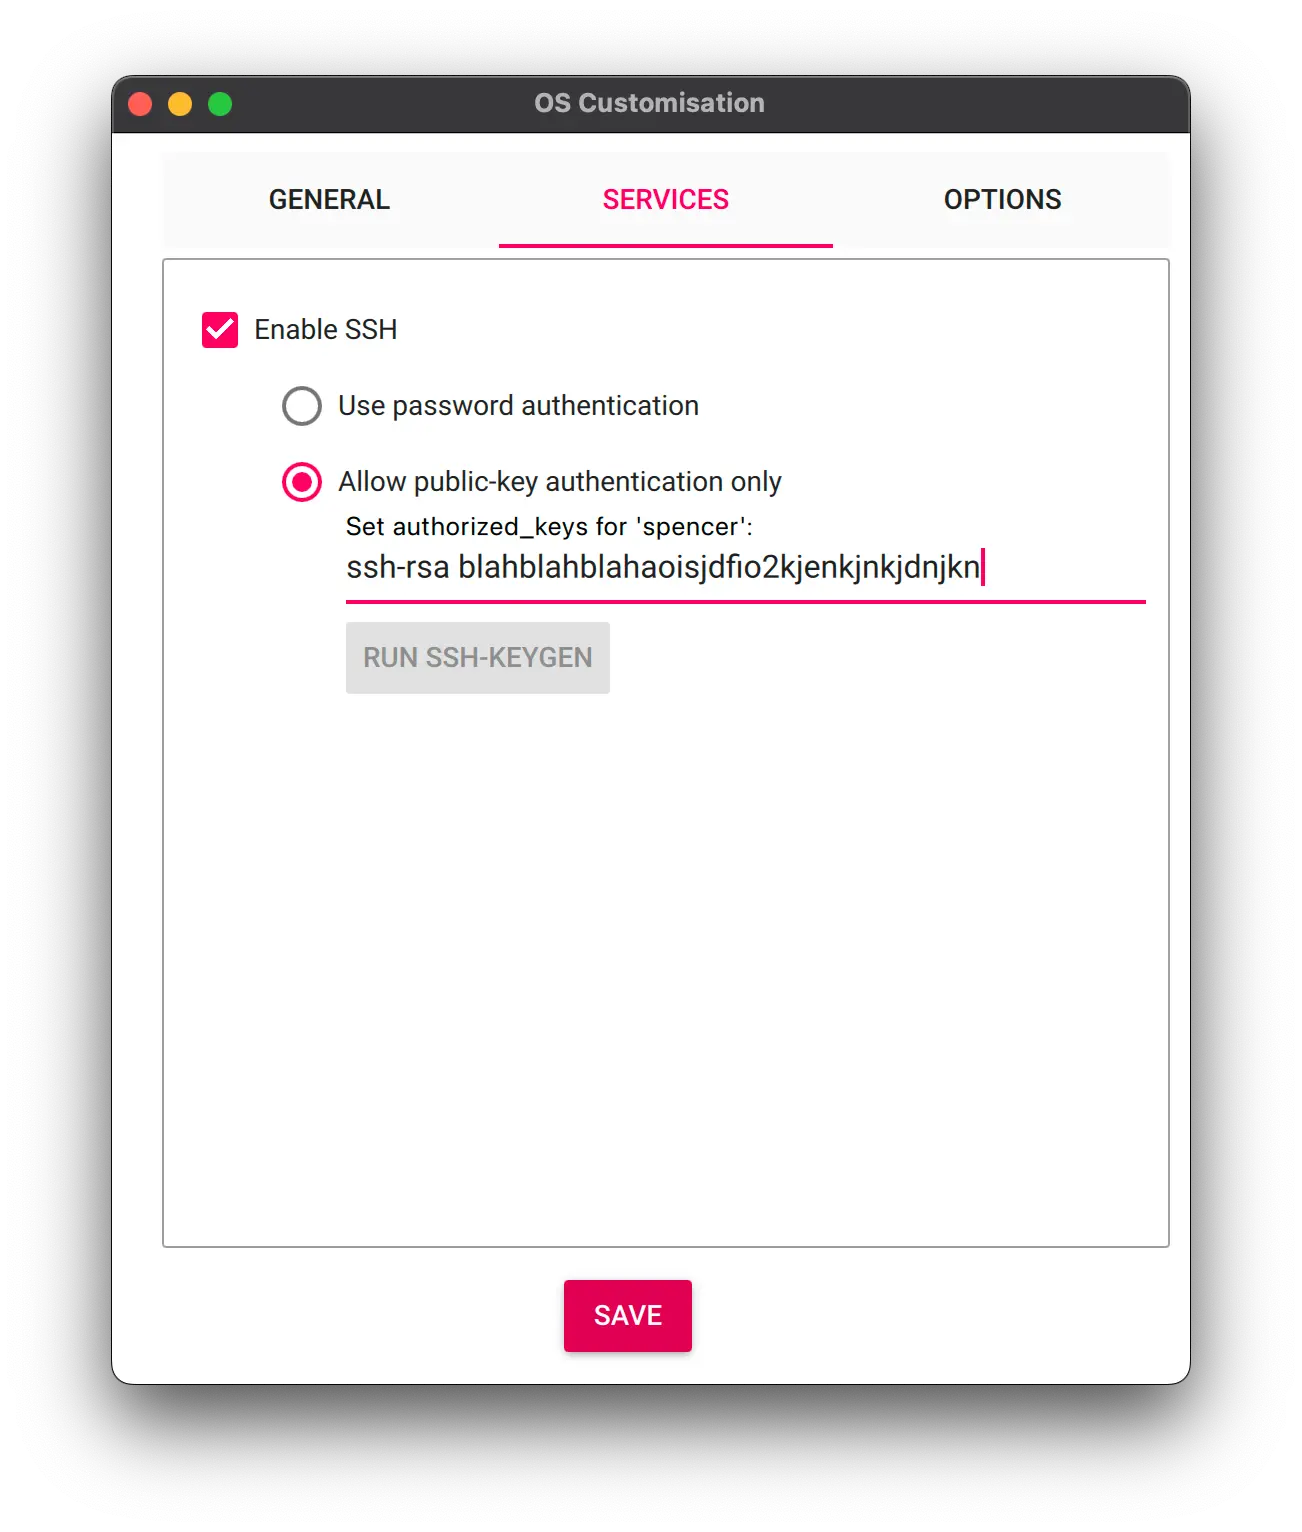
You'll also want to head over to the Services tab and enable SSH. I recommend using public-key authentication [2], though if you're just setting this up for your local home network, password-authentication is probably fine, too.
To apply these customizations, click save, yes, and then yes again. It'll take a few minutes for the app to write the image to the Pi. Once it has finished, eject the card and insert it into your Pi. You can power your Pi on now by plugging in your power adapter.
It will take several minutes for the Pi to boot up, but if you configured the WLAN settings correctly, it should connect to your network automatically. Now, we can SSH into the Pi. On macOS and Linux, you can just run ssh <username>@<hostname>.local.
[1] The FIM software we'll be using to display the images does not need a desktop environment, so I chose the lite version to keep things simple.
[2] If you don't have SSH keys set up on your machine, tilde.club has an excellent tutorial!
Installing Dependencies
Before we install our dependencies, it's good practice to perform an update. If you're SSH'd into the Pi, you can run these commands:
sudo apt update
sudo apt upgrade
Now we can start installing our dependencies. We'll need FIM for displaying the images, and ffmpeg for processing our uploaded images (resizing and converting to JPG):
sudo apt install ffmpeg fimWe'll also install NodeJS for running the PhotoCrust web server. Admittedly, NodeJS is overkill for a project like this. We'd be better off creating a web server with a compiled language like Rust (or maybe Gleam), but I had a deadline for this project so I stuck with what was familiar.
Installing NodeJS is a little different on an armv6l device such as the Raspberry Pi Zero. NodeJS does not provide "official" builds for 32-bit arm processors, but they do provide unofficial builds...
First, we're going to install the NVM script to manage our Node installation easier. You can do so through this command:
curl -o- https://raw.githubusercontent.com/nvm-sh/nvm/v0.39.7/install.sh | bashAfter you run that, it will instruct you to log out and back in of the terminal, which you can do like so:
exit
ssh <username>@<hostname>.local
You can check that nvm has installed correctly by running nvm -v. Now we'll install NodeJS. The latest version at the time of writing, v22.2.0, doesn't seem to have an armv6l build. I ended up going with v21.7.3, but you can peruse through the unofficial builds directory to see if there's a newer version for armv6l.
We can install this version of NodeJS with NVM by setting an environment variable like so:
NVM_NODEJS_ORG_MIRROR=https://unofficial-builds.nodejs.org/download/release nvm install 21.7.3Once that has finished, you can check the installation with node -v.
Installing PhotoCrust
PhotoCrust is the web app I built that lets us upload photos to the Pi. It also handles resizing and converting these images. First, you'll want to copy the link to the tarball from the latest release. Click the dropdown arrow for Assets, then right click the file titled photocrust-vX.X.X.tar.gz and choose copy link address.
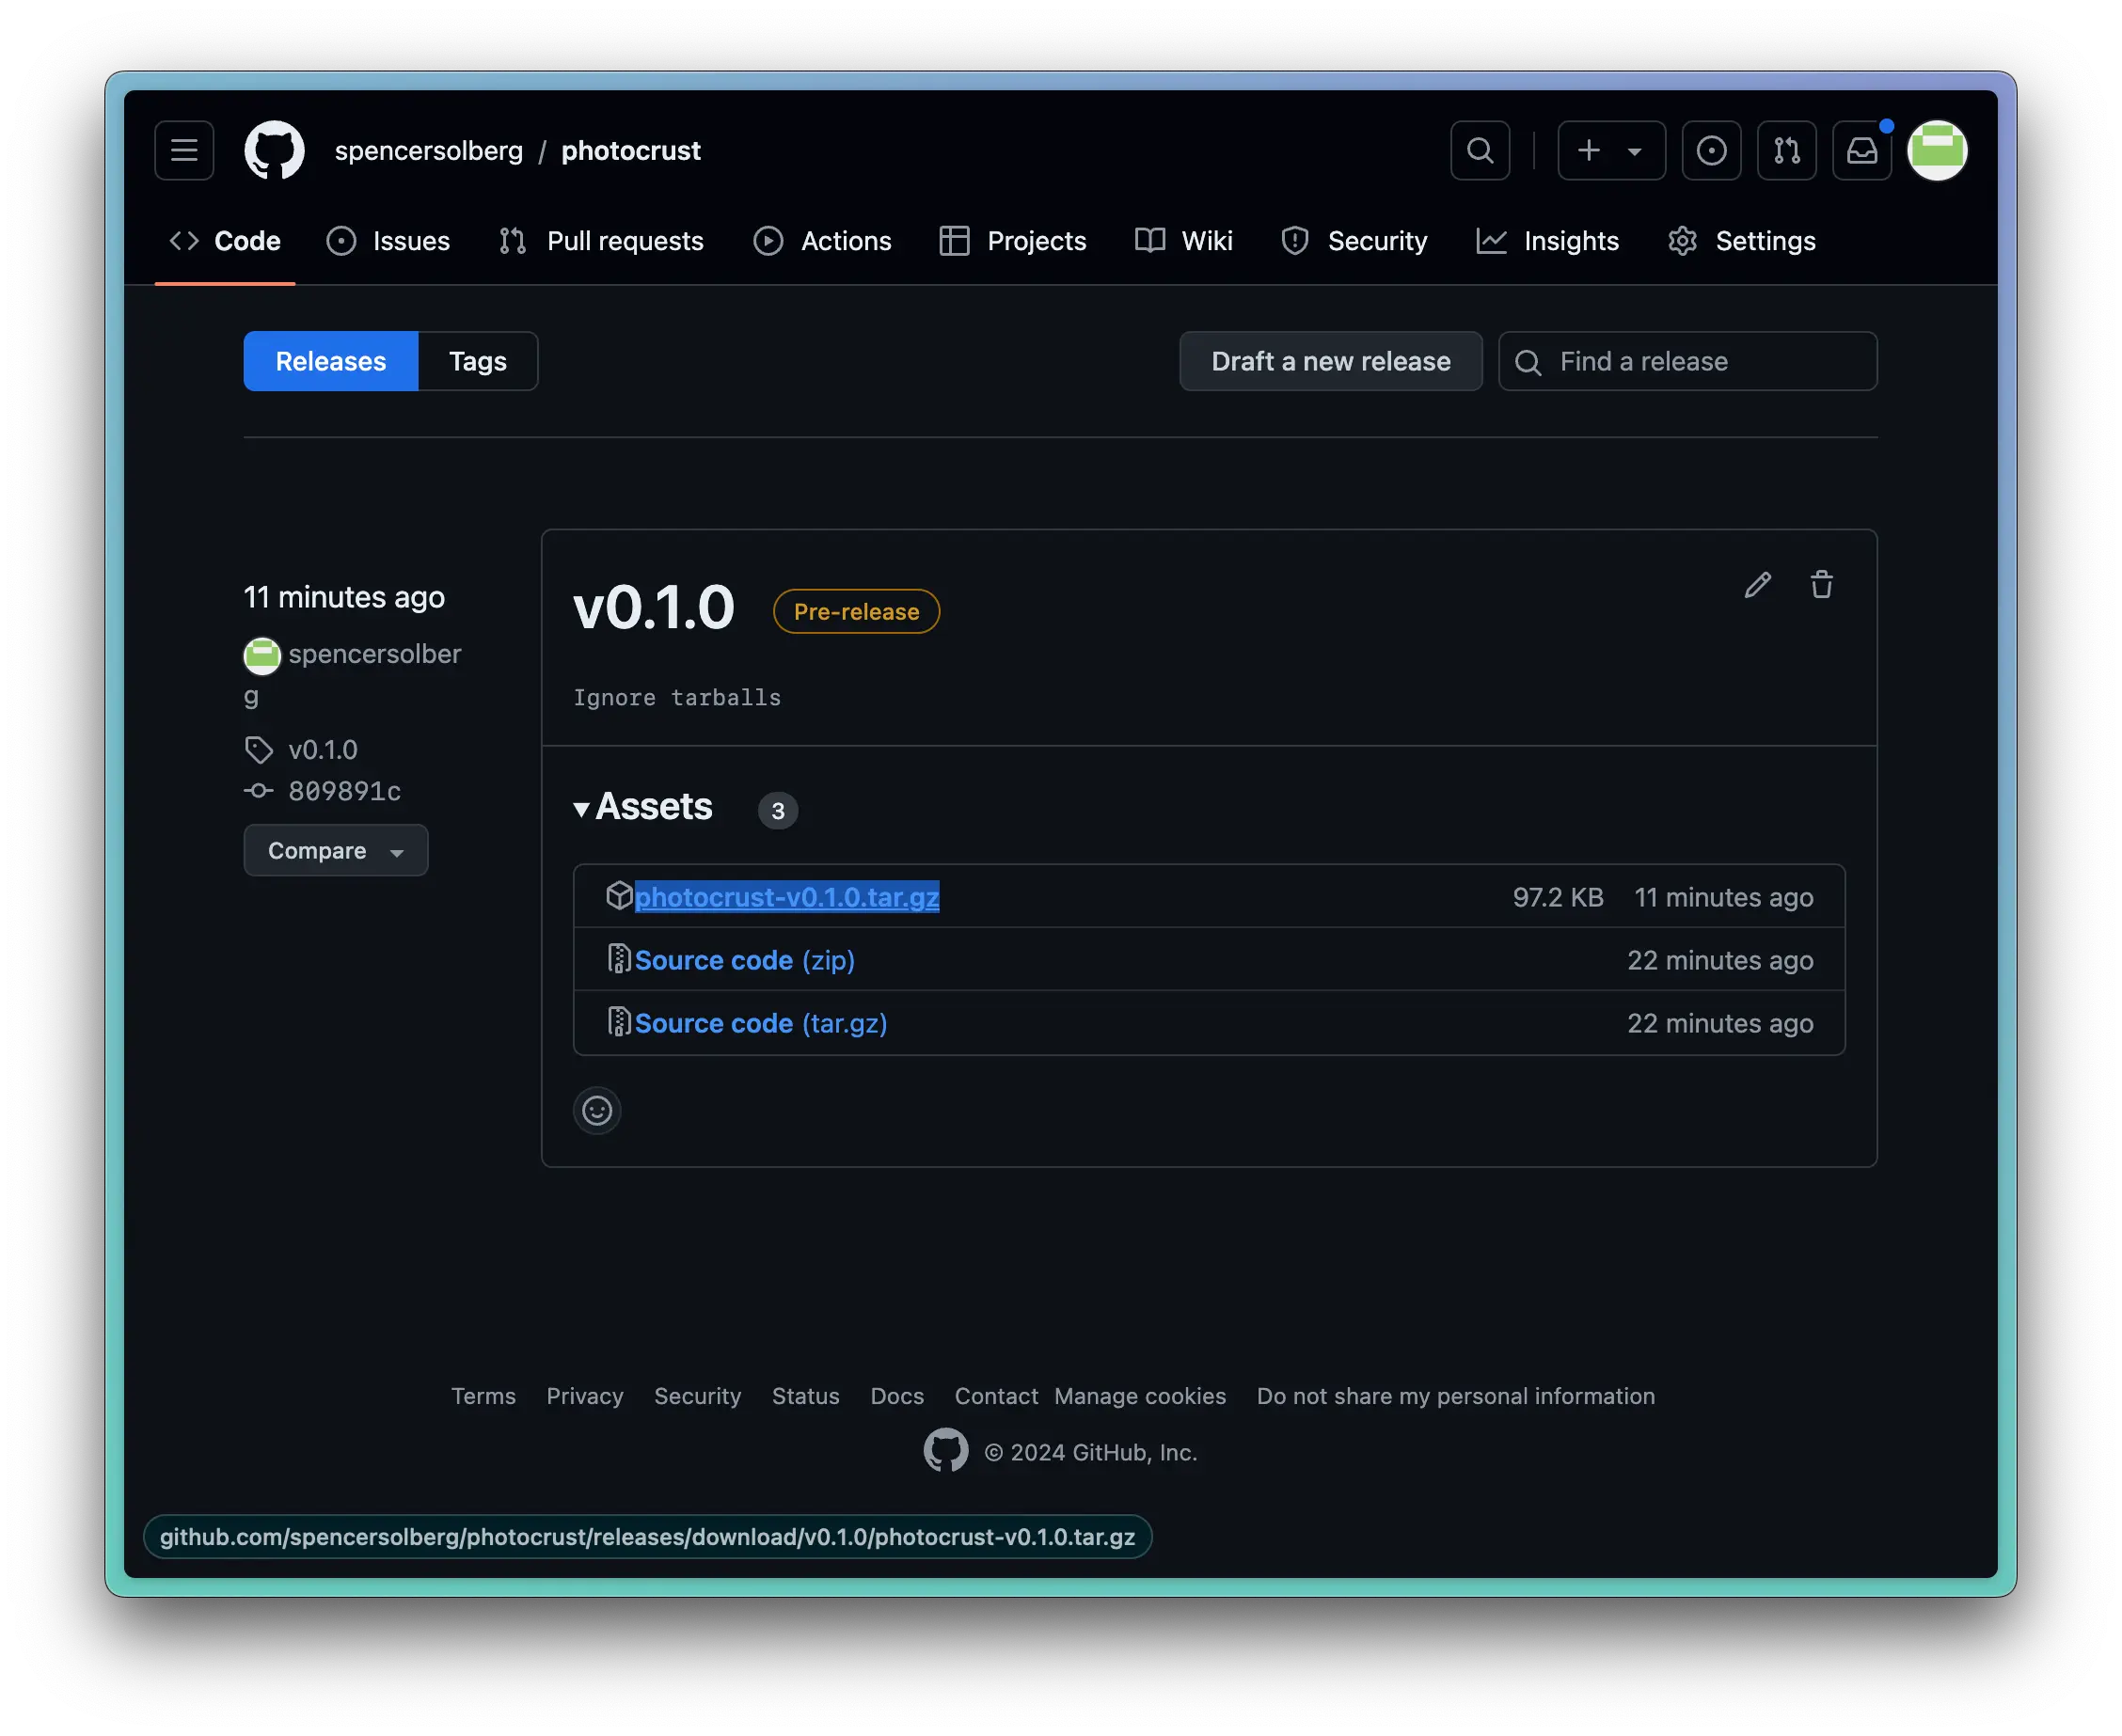
Then, SSH'd into the Pi, type in wget followed by a space and the link you've just copied, e.g. wget https://github.com/spencersolberg/photocrust/releases/download/v0.1.0/photocrust-v0.1.0.tar.gz. This will download that release and save it to the Pi in your current directory. Now, let's make a folder and extract the tarball's contents into there:
mkdir ~/photocrust/
tar -C ~/photocrust/ -xzvf photocrust-v*.tar.gz
rm photocrust-v*.tar.gz
After this, we can cd into the directory and install the project's dependencies:
cd photocrust
npm i
npm run build
This process will take several minutes, especially on the low-powered Pi Zero W. Once it's finished, we'll need to configure a couple of things before we're ready to use the app. First, let's create two directories. One to store the photos for our slideshow, and another to store the images temporarily as they're being processed.
mkdir temp
mkdir photos
Then, we'll also create a .env file which the PhotoCrust server will read to understand where these directories are. We'll use the text editor, Nano, to do this:
nano .envType in something like this:
TEMP_DIRECTORY=/home/<username>/photocrust/temp/
PHOTOS_DIRECTORY=/home/<username>/photocrust/photos/
Don't forget to replace <username> with your own username, and also to include the trailing slash at the end of each line. To save this file, hit Ctrl + X, Y, and Enter.
Now we need to install PhotoCrust as a systemd unit. This will automatically start the application at boot time and keep it running. Create a service file with Nano:
sudo nano /etc/systemd/system/photocrust.servicePaste in something like this, remember to modify the User, WorkingDirectory, ExecStart, and Environment lines to match both your username and the version of node you're using (node -v)
[Unit]
Description=PhotoCrust Service
After=network.target

[Service]
User=<username>
WorkingDirectory=/home/<username>/photocrust
ExecStart=/home/<username>/.nvm/versions/node/v21.7.3/bin/npm run start
Restart=always
Environment=PATH=/home/<username>/.nvm/versions/node/v21.7.3/bin:/usr/bin:/usr/local/bin

[Install]
WantedBy=multi-user.target
Once again, use Ctrl + X, Y, and Enter to save. Now that we've created the service file, we can run the following lines to enable it:
sudo systemctl daemon-reload
sudo systemctl enable --now photocrust.service
After these commands finish, wait about a minute, and then run systemctl status photocrust. If everything's set, you should see a green status displaying "active", and a log message indicating the service is up and running at http://localhost:3000. Now, back on your computer, open your web browser and navigate to http://photocrust.local:3000 (or if you didn't name yours photocrust, <hostname>.local:3000). You should see this:
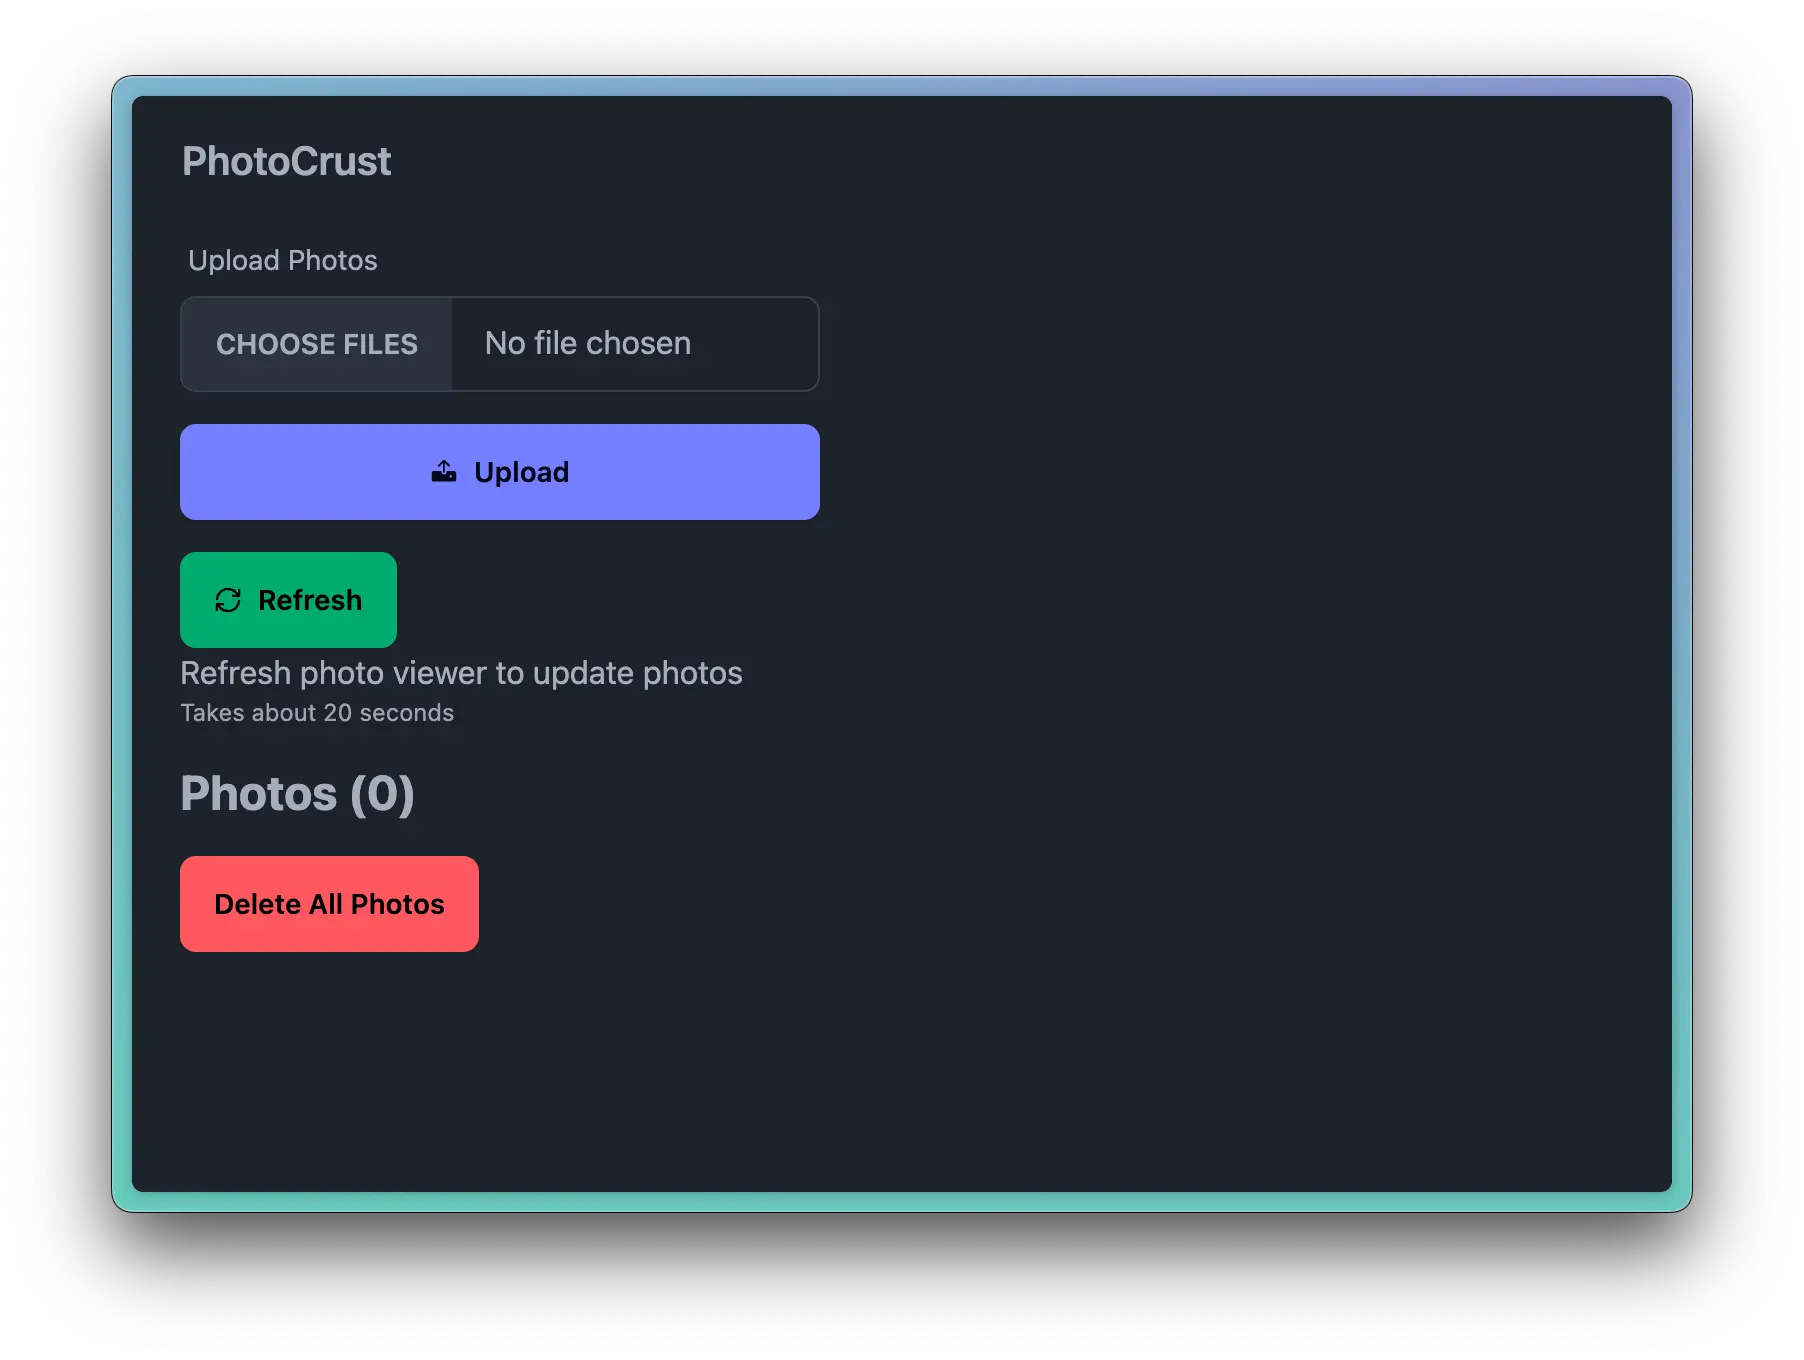
Feel free to play around with this/upload your photos now. Though, they won't be displayed until we configure FIM.
Configuring FIM
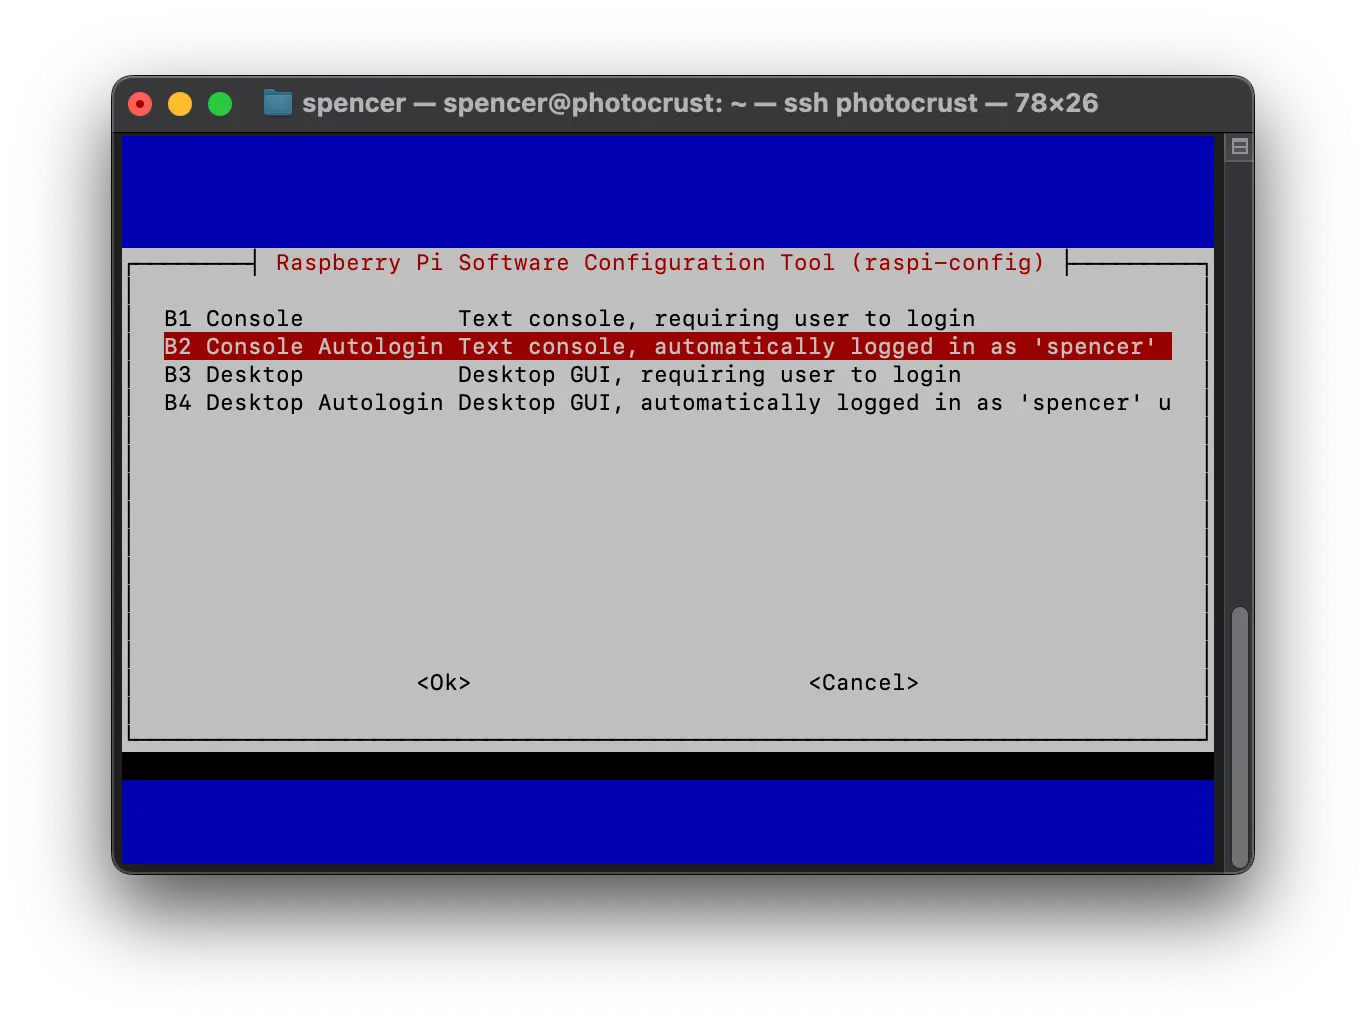
Before we can setup our slideshow, we'll want to enable auto-login on the Raspberry Pi. We can do so by running this program:
sudo raspi-configUse the arrow keys and enter to navigate to "1 System Options", and then "S5 Boot / Auto Login". Once you are in this menu, select "B2 Console Autologin". When you hit enter, it will take several seconds and then bring you back to the main raspi-config screen. It might seem like nothing happened, but fear not, the change has applied.
Great! Now let's create a script that cycles through our photos using FIM.
cd ~
nano slideshow.sh
Paste something like this:
#!/bin/bash

if [[ $(who am i) =~ \([-a-zA-Z0-9\.]+\)$ ]] ; then
    true;
else
    sleep 20
    fim -auqR /home/<username>/pictures/* -c 'while(1){display;sleep "120";next;}'
fi
Be sure to substitue your own username in the second to last line. The reasoning behind the if statement is to prevent this script from running when we connect over SSH. The who am i command is used to make this decision, as it reports how the user is connected to the terminal session. I found that I needed to add a sleep statement before the fim program starts, but you can tweak that if needed.
Save that script. You'll also need to make it executable:
chmod +x slideshow.shIf you've already connected your screen, you can test this script out by running ./slideshow.sh (make sure you've added photos through the photocrust.local:3000 web app).
Now we need a way to make the script automatically start at login. I've found that the most straightforward way to do this is through .bashrc.
nano .bashrcScroll to the end of the file, and add these two lines:
PROMPT_COMMAND='echo -e "\e[?16;0;200c"'
bash /home/<username>/slideshow.sh
The first line is a little trick to hide the flashing cursor. If you don't include this line, it will be blinking over your slideshow. The second line simply executes the script we created earlier.
Now that our script runs automatically at login, and we're automatically logged in, our slideshow is effectively running constantly (so long as a screen is plugged in).
Putting it all Together
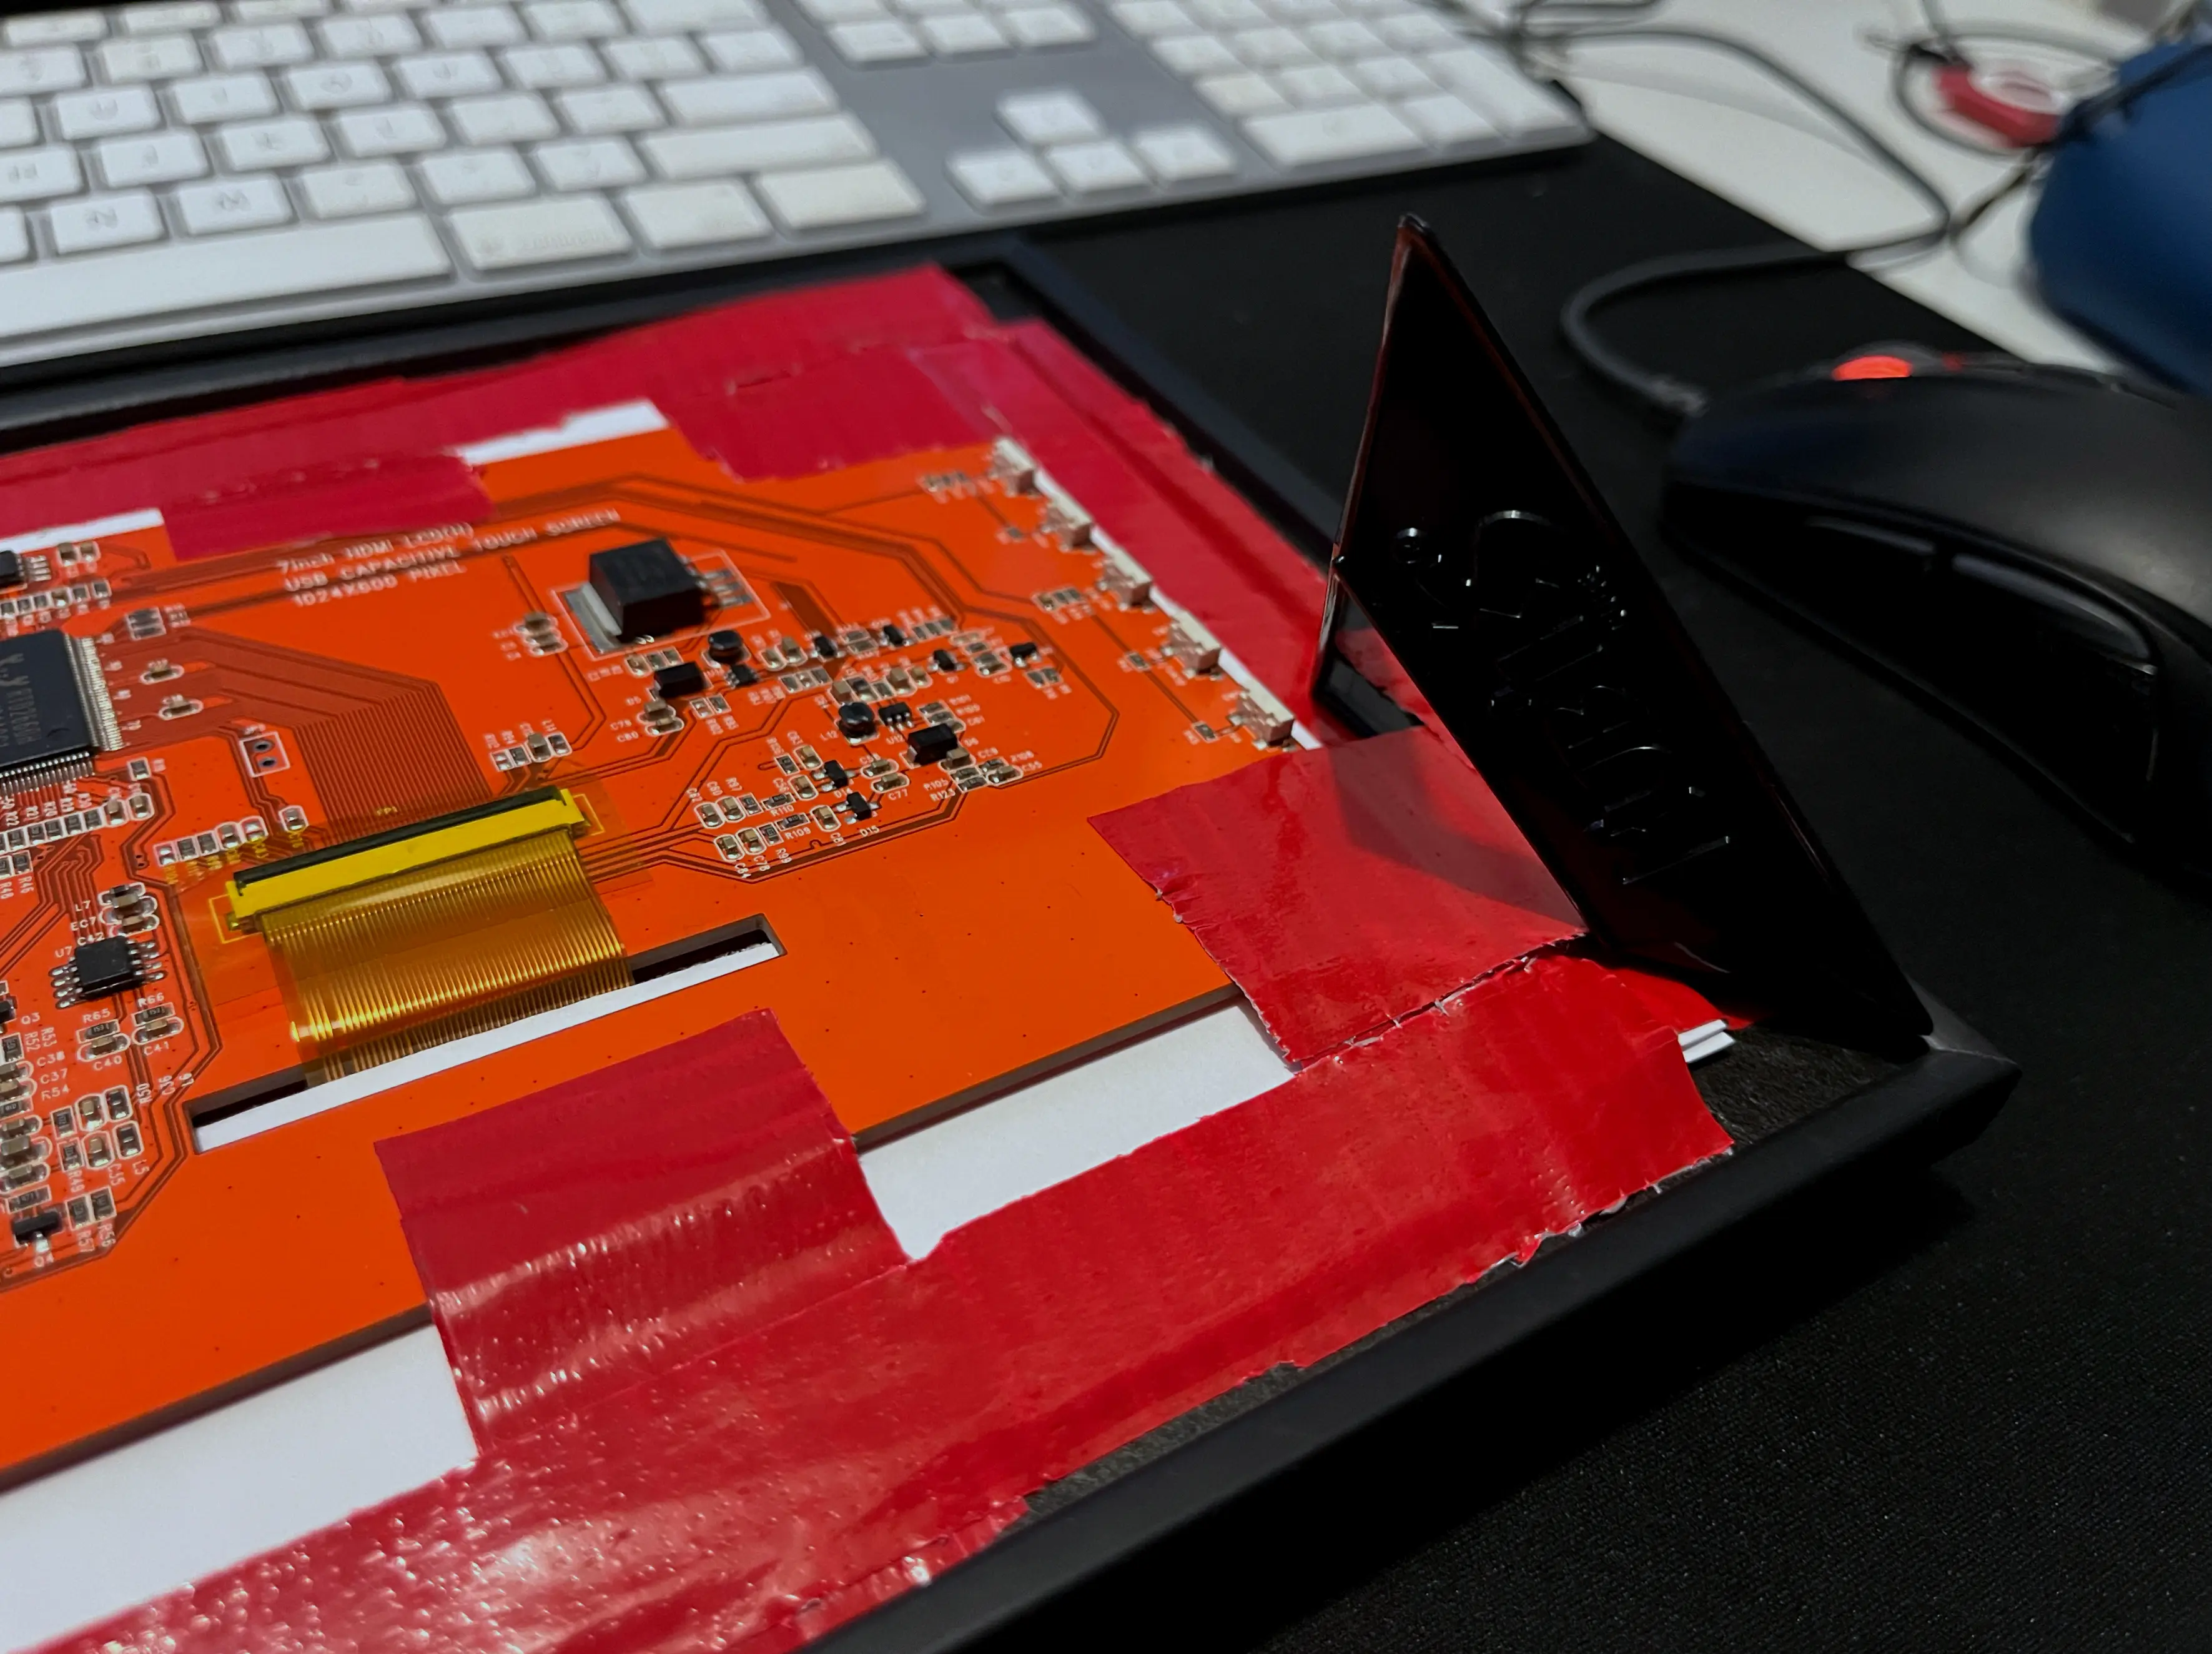
I won't write too much about the assembly side of things, as it will depend on your screen, Pi, photo frame, whether you have a 3d printer, etc. I purchased a 4x6 photo frame for my 7" screen. I used cardstock paper to fill in the gaps and taped the entire thing up so it would stay together.
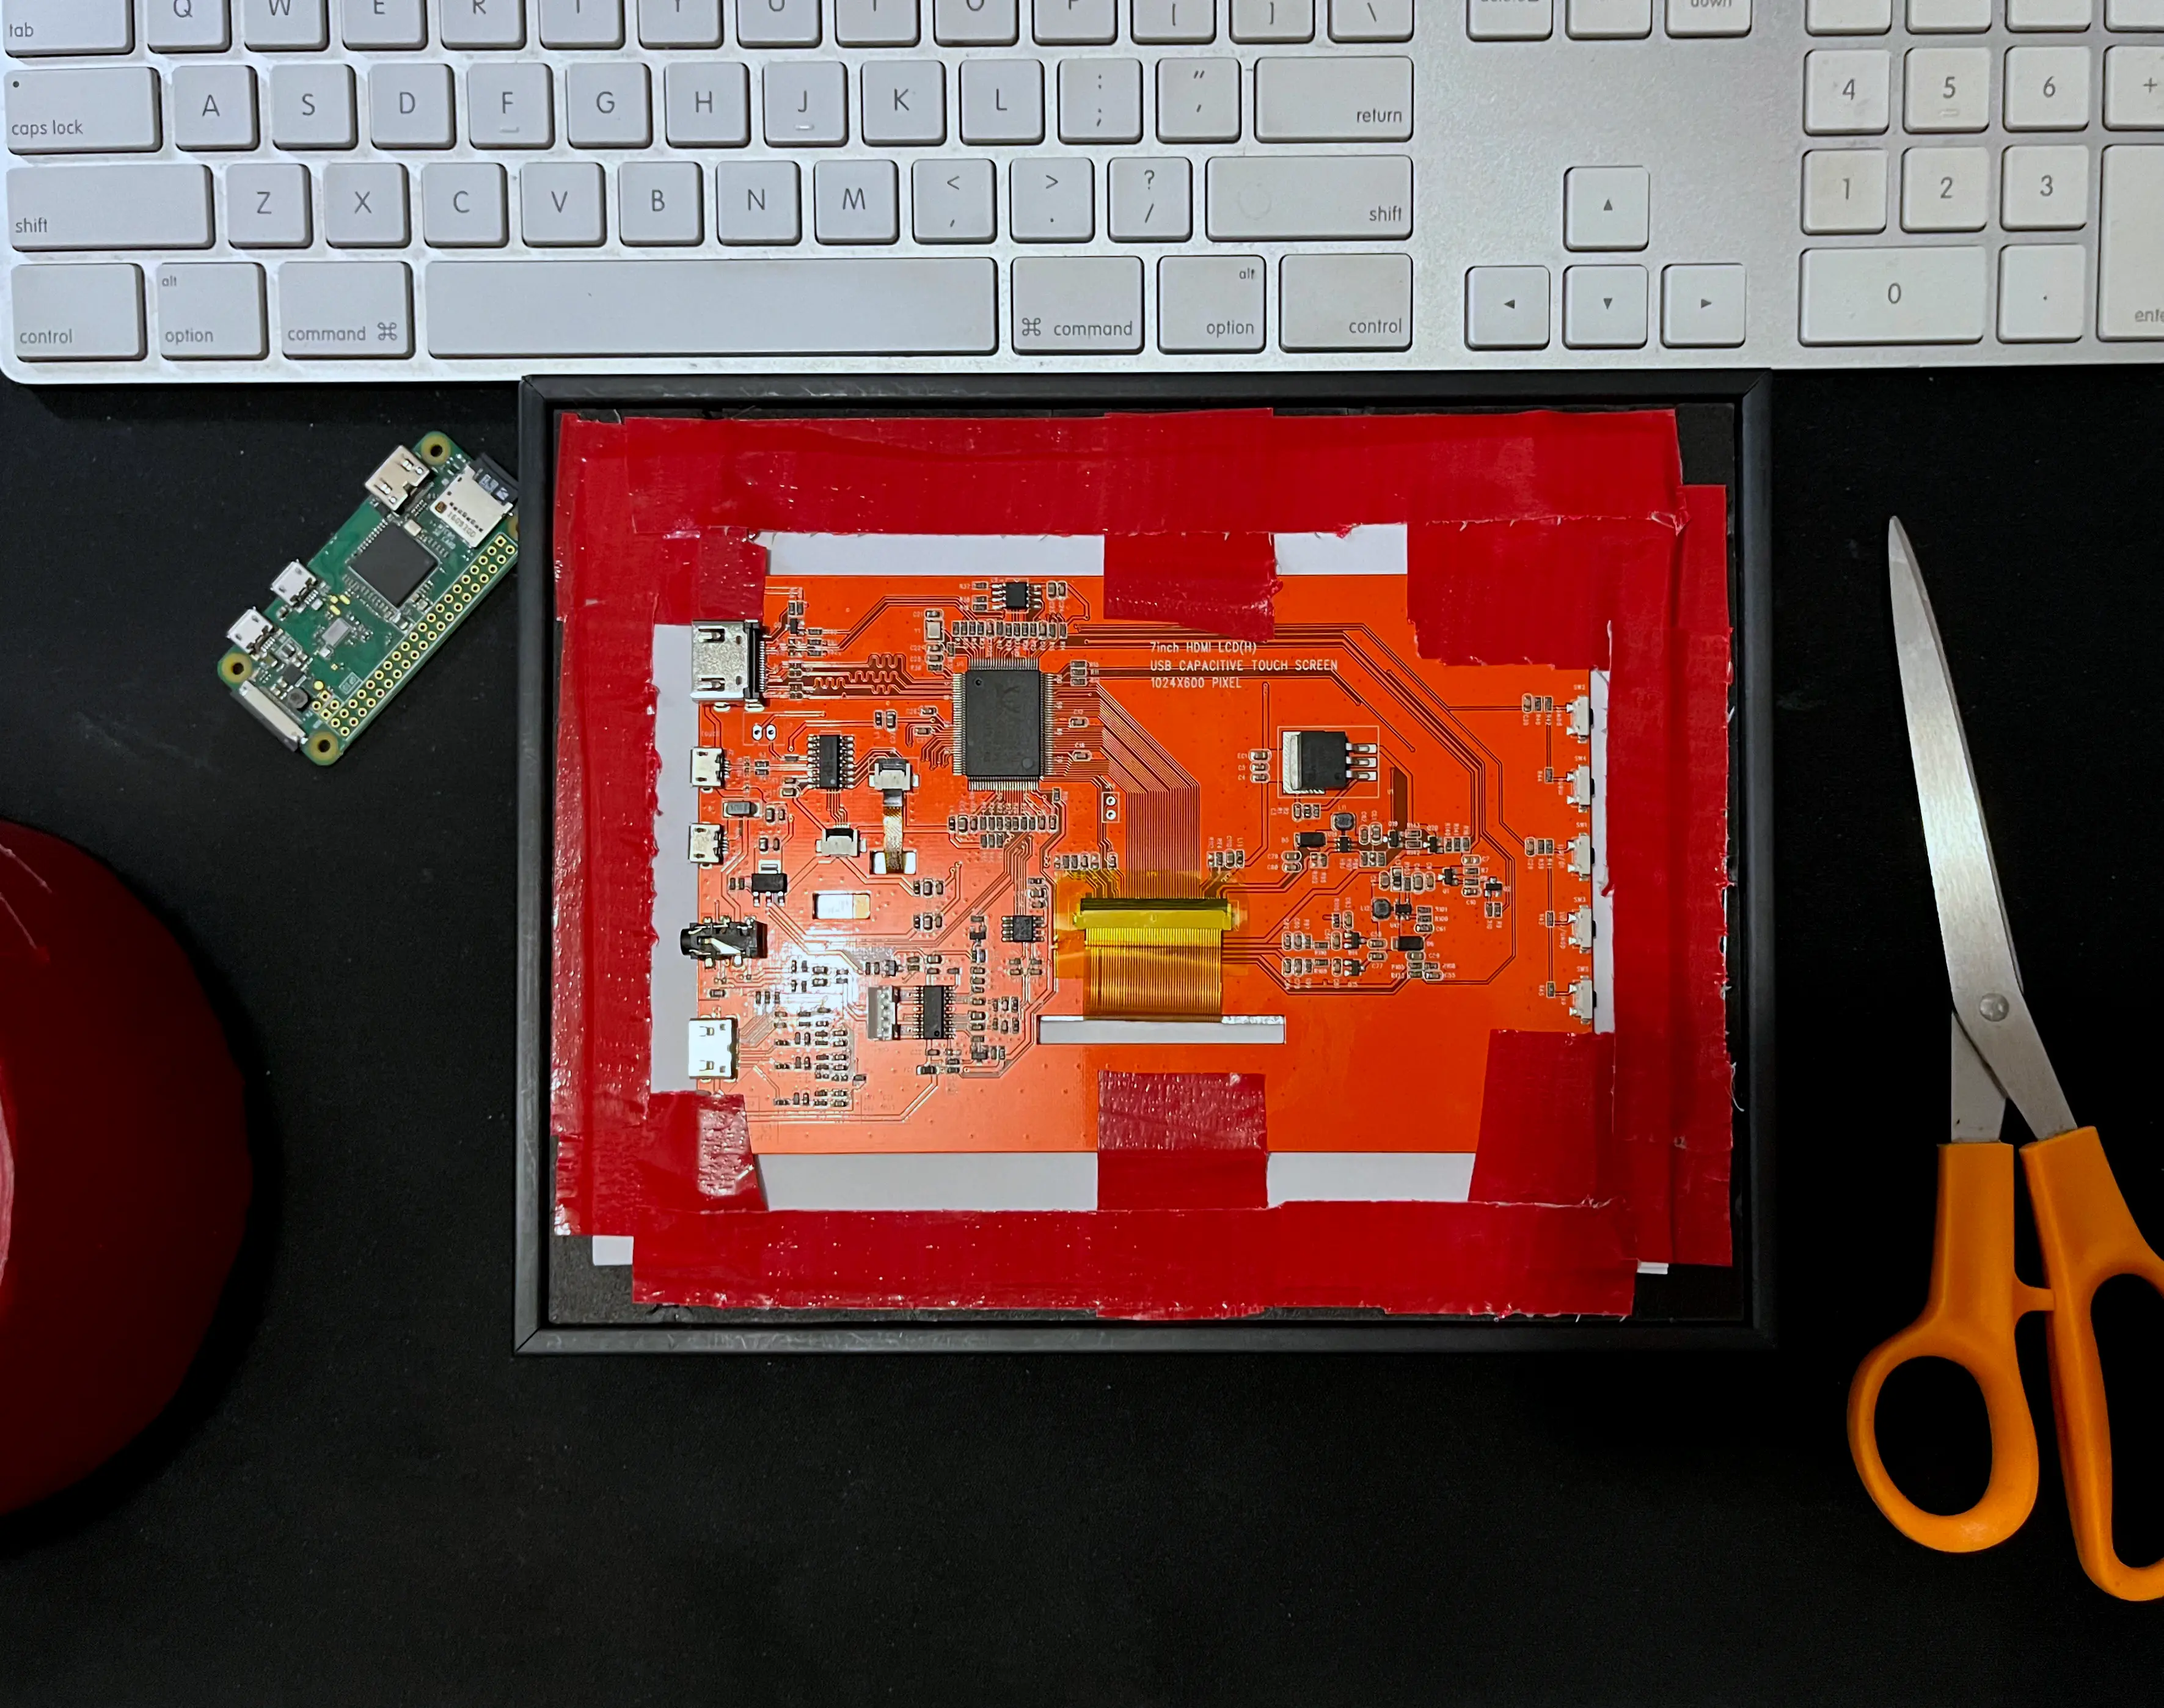
For the feet, I used some spare Rubik's cube stands, one on each side. I hope they will hold up.
Here's what the finished project looks like:
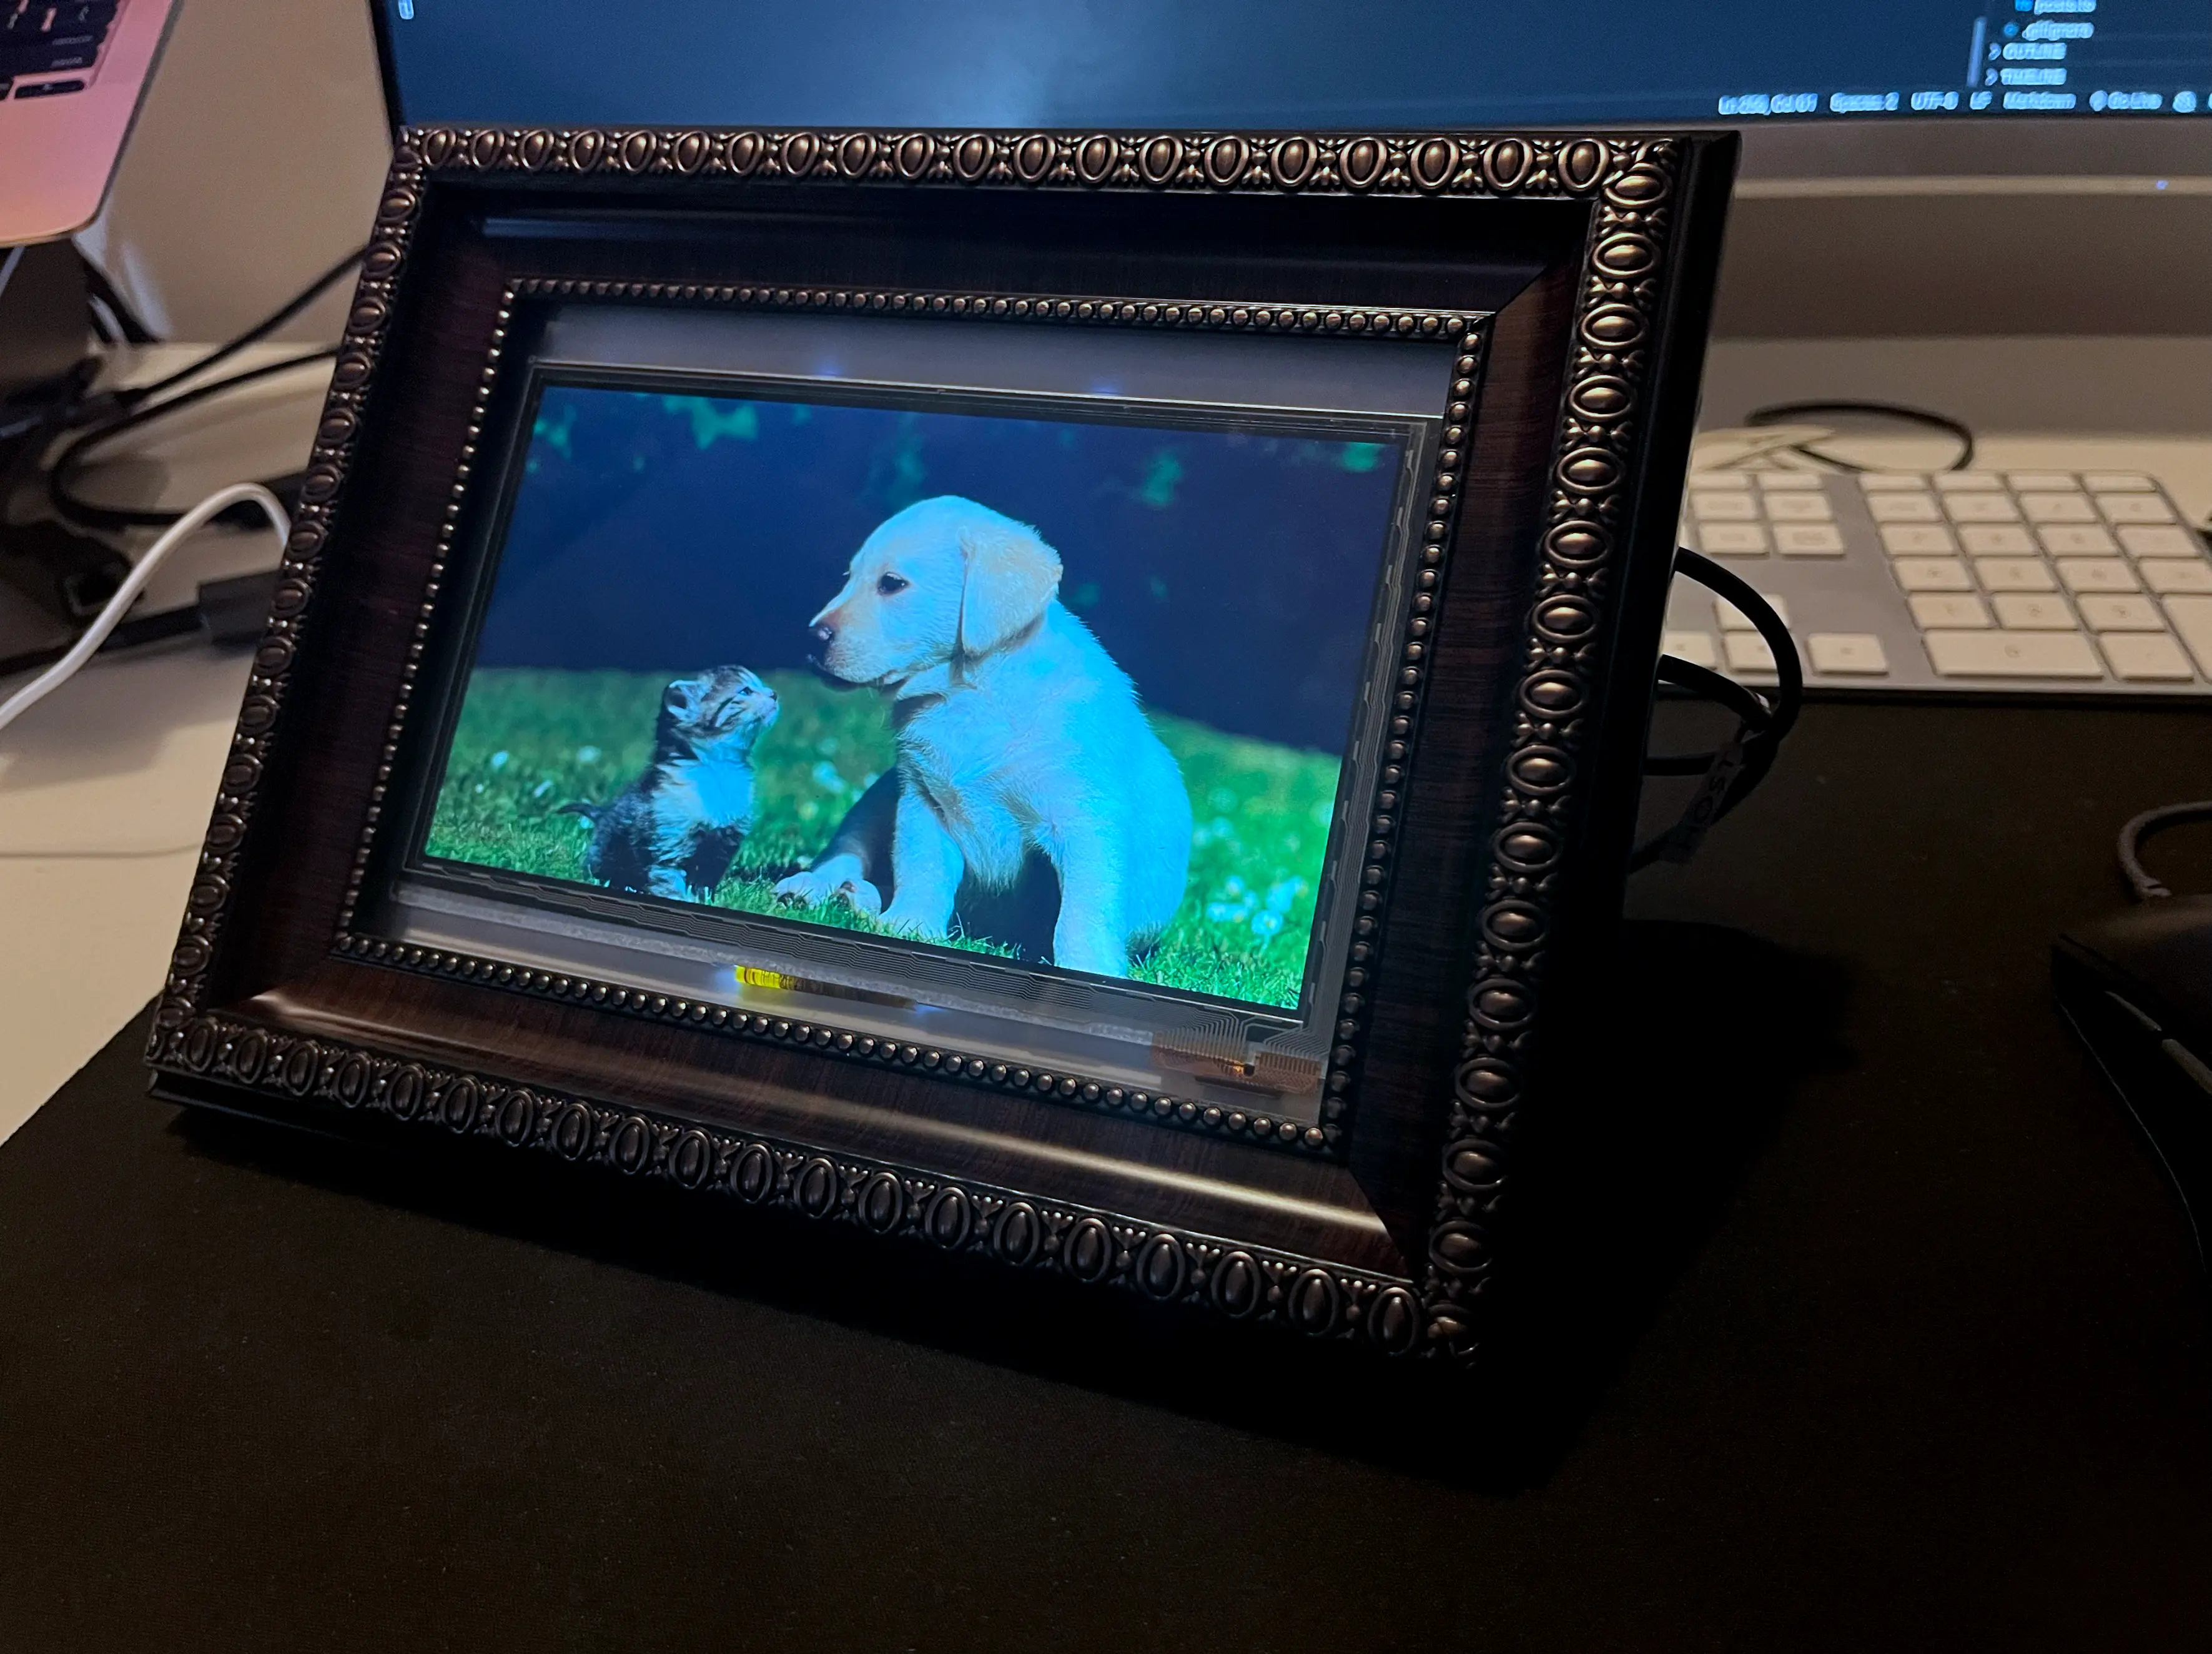
Depending on the angle and the cables you used, they might stick out a bit. I think mine turned out pretty nice.